piCture pOlish Swatches...

Wednesday, July 31, 2013
For the sake of not overloading the Blog Fest post on Monday, I would like to show you my swatches of the piCture pOlish shades that I used for the manicure (and one more for the heck of it), today. I was going to show them to you yesterday, but I somehow got pulled into watching Ukraine Got Talent on YouTube all night instead of writing the post. I admit it, it's my guilty pleasure. Half the time they speak in Russian and I can understand it and the other half they speak Ukrainian and I'm looking at my bf for translation. His translation is always along the lines of "they didn't say anything interesting" so I gave up, but the acts on there are still pretty amazing to watch. Well that was pretty random, so let's get back to the swatches...

Citrus - "looks as good as it tastes!"
A bright orange cream that lives up to it's citrus name. I'm a bit confused by the tag line though since I would think it looks better than it tastes although honestly I have not tested that theory. The formula on this one is nice and smooth. It took just two coats to reach full opacity. No problems with application. These swatches are with no top coat...


Swatch Details
Brand: piCture pOlish
Collection: core
Color Name/Number: Citrus
Number of coats: 2
Top Coat: No

Free of Formaldehyde, Toluene, Dibutyl Phthalate (DBP)

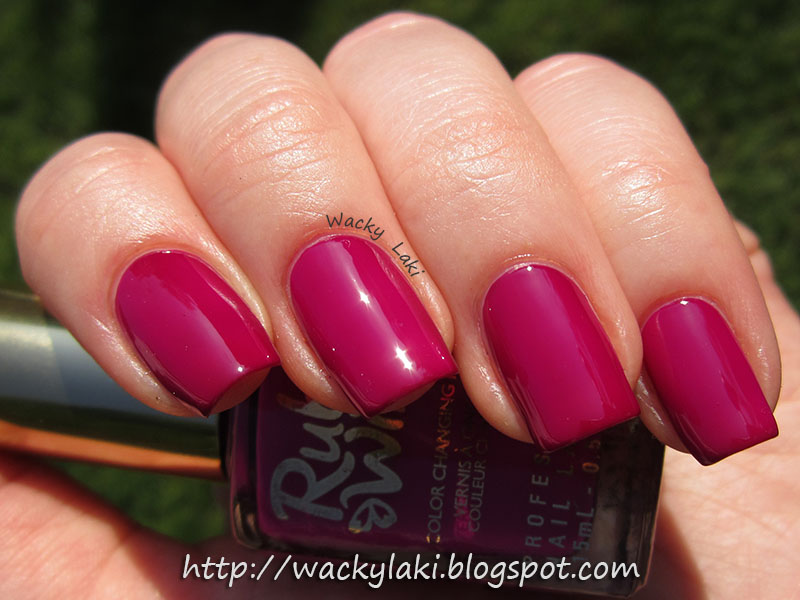
Flirt - "WARNING get loads of attention..."
A bright fuchsia pink cream. I can't say I'm pleased with these swatches. The color is a lot more vibrant and a bit more fuchsia in real life than it appears in these photos. I'm not sure why my camera was determined to dull the color so much. It really will get you loads of attention. The formula again is very nice and smooth. Two coats for full coverage and the swatches are with no top coat...


Swatch Details
Brand: piCture pOlish
Collection: core
Color Name/Number: Flirt
Number of coats: 2
Top Coat: No

Free of Formaldehyde, Toluene, Dibutyl Phthalate (DBP)

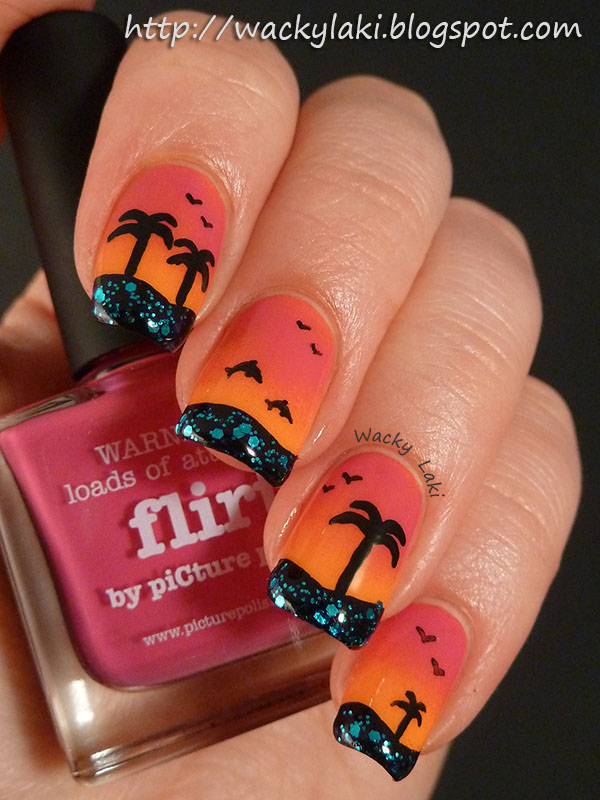
A peek at the gradient that was the base of my sunset manicure for Blog Fest on Monday. I started out with Citrus as the base and then sponged the two colors on top using a cosmetic wedge to achieve the gradient. See the previous post for a tutorial...


Tiffany - "diamonds with breakfast"
A cool minty blue cream that I think as the name suggests would best be described as Tiffany blue. This was not one of my Blog Fest colors and I've already shown it before, but I wanted to use it as a base for my Splash swatch later on, so I figured it wouldn't hurt to re-swatch it as well. The formula on this one is nice although it needed three coats to reach full opacity. No top coat was used for these swatches...


Swatch Details
Brand: piCture pOlish
Collection: core
Color Name/Number: Tiffany
Number of coats: 3
Top Coat: No

Free of Formaldehyde, Toluene, Dibutyl Phthalate (DBP)

Splash - "if Daryl can you can too!"
A clear base with a mix of small and large blue hex glitter. I'm a bit lost on the tagline reference, but the glitter needs no explanation for me. It can be easily layered over many different colors for a touch of sparkle. I thought it looked great over black in the sunset mani, but I'm equally loving it over this blue. I used one coat of Splash over Tiffany. It applied very easily with great glitter distribution. Swatches are with a top coat...


Swatch Details
Brand: piCture pOlish
Collection: core
Color Name/Number: Splash
Number of coats: 1 (layered)
Top Coat: Yes

Free of Formaldehyde, Toluene, Dibutyl Phthalate (DBP)

Thanks for looking!
Anutka :)


** Polishes were provided to me for review by the manufacturer or their PR. **
** For more information please see the disclosure policy **

piCture pOlish Blog Fest 2013

Monday, July 29, 2013
I'm so honored to once again get the opportunity to participate in the annual piCture pOlish Blog Fest. This year, piCture pOlish is celebrating the Year of the Blogger by challenging the participants to create our ‘most amazing nail art manicure ever’ using 3 piCture pOlish which were sent to us. In addition we were asked to create a step by step tutorial for the look. No pressure, right?

Actually, if that wasn't pressure enough, there is the promise of an amazing Blog Fest Award. Three lucky bloggers who are participating in this year's Blog Fest will get the chance to collaborate with the gals at piCture pOlish and create their own shade. One winner will be chosen by all the lovely fans, one by the participating bloggers and one by the piCture pOlish gals themselves. Since I have already had the privilege of creating Sea Jewel, I'm not eligible for the Award, but I'm so excited to see all the manicures and vote for my favorite. I hope you'll be doing the same.

With the Award off the table for me, the pressure was lessened and I got to dreaming up my manicure using the 3 shades sent to me... Citrus, Flirt and Splash...


For this manicure, I used black acrylic paint and the 3 piCture pOlish shades:
Flirt, a bright fuchsia pink with the tagline of 'WARNING get loads of attention!'
Citrus, a bright orange cream with the tagline 'looks as good as it tastes!'
Splash, a clear base packed with blue glitter. The tag line on this one says, 'if Daryl can you can too!'


My boyfriend nicknamed the dolphins Michael Jordan because he said I made them jump unrealistically high. I was just excited he recognized them as dolphins... ;)


And now for the really fun part, the tutorial...

Supplies:
  • 3 piCture pOlish shades, Flirt, Citrus, Splash...
  • Black acrylic paint or nail polish
  • Makeup wedge or sponge for gradient
  • Small detail paint brush
Steps:


Instructions:
  1. Start out by painting your nails with an orange base
  2. Create a gradient by applying the fuchsia and orange polishes directly to the makeup wedge as shown in step 2a. Tap the sponge on the nail and gently move back and forth to blend the colors as shown in step 2b. Reload the sponge with polish and repeat as necessary until you get the desired effect.
    Tip: it is better to do multiple coats to build opacity than overload with polish from the beginning. Lighter coats also helps avoid the polish getting too sticky and ripping pieces of the sponge and creating a mess...
  3. Draw black wavy tips along each nail using black acrylic paint (or nail polish)
  4. Go over the black tips with the blue glitter
  5. Draw palm trees using black acrylic paint as desired
  6. Add birds and dolphins or other details using the black paint
  7. Finish the manicure with a top coat and enjoy!

You can purchase piCture pOlish directly from the pOlish On-line Store or any of the Network sellers...

Plus, there are lots of ways to connect with piCture pOlish. Find them on...
* Facebook * Twitter * Pinterest * Instagram * YouTube * Google+ *

You can see all the Blog Fest manis on Pinterest and make sure to vote for your favorites!


What do you think, did I meet the challenge of creating my ‘most amazing nail art manicure ever’? :D

Thanks for looking!
Anutka :)


Be sure to check out all the other beautiful Blog Fest 2013 manis...

** Polishes were provided to me for review by the manufacturer or their PR. **
** For more information please see the disclosure policy **

Pueen Love Elements Stamping Plates Review

Friday, July 26, 2013
Today I would like to show you the second set of stamping plates by Pueen. In case you missed it, you can check out my review of the first set here. As I mentioned yesterday, I received a few plates from this set for review and after falling in love with their quality, I purchased the full set for my growing stamping plate collection...

This is the Love Elements set...


This set also comes packaged in a small storage case. The case is made of a sturdy fake leather like material. There is an individual pocket for each plate in the set and the pockets swivel out for easy plate selection. The pockets are a bit flimsy for my taste if using them on a regular basis, but I think it will make an ideal travel case. For storage, I have my eye set on the larger Pueen organizer. Although I still have room in my similar Bundle Monster organizer, it just makes sense to put Pueen plates in a Pueen organizer, right?

Each plates comes with a protective blue cover which needs to be removed prior to stamping. The back of the plate is covered with a vinyl material that prevents the edges from being razor sharp. In addition it features the Pueen logo and company website (http://www.pueencosmetics.com). The plates are sturdy, don't easily bend and are overall very good quality...


The Love Elements collection includes 24 plates which feature 96 full nail designs and 48 smaller images. Why this set contains 24 plates while the first one had 25 is a mystery to me. All of the images that I have tried so far have stamped extremely well. I have not had any problems with them thus far. Although I was initially more drawn to the first set for what seemed to be more delicate and detailed designs, I have been rather impressed with the selection of images in this set. There are lots of beautiful designs to choose from...

These are scans of my actual plates. Click to zoom in for a full size view...


One major improvement over the first set is that the full images do not contain that pesky curve which cuts into the design. Not only was the curve eliminated, but the images are also 1 mm longer and wider making their overall size 14x18 mm compared with 13x15 mm of the first set. That is a big difference and scores huge points in my book. Way to go Pueen! With the curve eliminated, I officially have nothing negative to say about these plates. Love them...


A few manicures that I've made with these plates so far...
(click on photo for original post...)


This set of 24 plates can be purchased for $18.99 and is available on both the Pueen website and Amazon.com.

Thanks for looking!
Anutka :)

Pueen Sumptuous Gallery Stamping Plates Review

Thursday, July 25, 2013
I guess the one good thing about having a nail break and taking time away from swatching is that I finally have no excuse to delay my review of the Pueen stamping plates. I have already shown you a number of manicures with these plates, but today I would like to show you the plates themselves and my thoughts on them. I received a few plates from both this collection and the second one (which I will show you tomorrow). I quickly fell in love with the quality and bough both sets to add to my collection...

This is the first set named Sumptuous Gallery...


The set comes with a small storage case which has an individual pocket for each plate. The case itself is quite nice and sturdy made of a fake leather like material. The pockets swivel out to display a fan of plates allowing for easy plate selection. The pockets themselves are rather thin and I fear they would tear easily. I plan on purchasing the larger Pueen organizer (which is similar to the Bundle Monster organizer that I already own) to store them and using these small cases for travel.

Each plate come with a protective blue cover on the front which needs to be removed prior to stamping. The back of the plates are covered in vinyl which features the Pueen logo as well as their website (http://www.pueencosmetics.com). In addition to providing company info, it acts a smooth out the otherwise sharp metal edges. The plates are high quality and very well made...


This set includes 25 stamping plates with 100 full nail designs and 50 small images. The images that I have tried so far have all stamped exceptionally well. I have not had a problem with any of the designs being stubborn or not transferring. I absolutely love the full size patterns in this set, in particular all the damask patterns that I have been wanting to see for so long. Of course there is plenty of variety including geometric patterns and some unique animal print as well. And how can anyone resist the adorable small images such as the snail on plate 20...

These are scans of my actual plates. Click to zoom in for a full size view...


The full images are a decent size although they do feature the dreaded curve. I refer to it as the dreaded curve because it takes away 2 mm of the image essentially cutting down the stampable (is that a word?) design from 13x17 mm down to 13x15 mm. My nails are often longer than 15 mm, leaving me with just the smaller images to play with. Of course there are plenty of people who have shorter nails and aside from this size shortcoming, these plates are excellent...

The thought is that with the curve in place, any of the images can be used as a french tip design. As far as I'm aware, most people don't like or use the french tip images to begin with. In all the sets that I own, I rarely use the french tip designs and when I do use them, it is out of sheer determination to not let them go to waste. Although I'm extremely happy that this set doesn't have plates full of nothing but french tip designs, cutting into every design to accommodate for the possibility of wanting to use them for a french tip just seems silly to me. I wan my 2 mm back. :)


A few of the manicures with these plates that I have shown you so far...
(click on photo for original post...)


This set of 25 plates can be purchase for $18.99 and is available on both the Pueen website and Amazon.com.

Thanks for looking!
Anutka :)

Nicole by OPI - Modern Family Sweepstakes!

Wednesday, July 24, 2013
Nicole by OPI is having a fantastic sweepstakes where three lucky winners will get the entire Modern Family collection just for sharing their most memorable family vacation story! Winners chosen at random so don't miss your chance to enter! You can see my swatches of the collection here and here...


Nicole by OPI Modern Family Collection Sweepstakes


Nicole by OPI Modern Family Collection Sweepstakes

How to enter: Share your most memorable family vacation story on the sweepstakes tab on Nicole by OPI's Facebook page. This will unlock the sweepstakes entry form - fill it out and click submit!

Rules: One entry per person. Valid to residents of US & Canada, excluding Quebec.

Prize: entire range of Modern Family shades

Winners: 3 lucky winners will be chosen at random on August 5th, so get your entry in today!

Contest link: Enter Here


** Disclaimer: All information and images in this post provided by the manufacturer or their PR **

Ruby Wing Crowd Surf...

Anyone in Seattle will tell you that you have to enjoy the sunshine while it lasts because around here summer is short. I'm savoring every bit of sunshine that I can and what better way to enjoy it than with a Solar Active shade from Ruby Wing. Even if you are the type of person who doesn't like going outside, these will make you want to go out just to watch it change...


Indoors, Ruby Wing Crowd Surf is a bright neon fuchsia purple. The formula is nice and smooth, easy to apply. Three coats as seen in these swatches will provide full coverage. It dries to a satin finish which is beautiful, but I did use a top coat for these swatches...


A quick shot of what it looks like before the top coat. Satin-y and soft...


Outdoors, Crowd Surf quickly changes to a deep berry burgundy shade. In real life, the change is a bit more dramatic than it appears in these swatches as it changes from a purple to a more red and much darker shade...


Swatch Details
Brand: Ruby Wing
Collection: Festival Paint Collection, Summer 2013
Color Name/Number: Crowd Surf
Number of coats: 3
Top Coat: Yes

Free of Formaldehyde, Toluene, Dibutyl Phthalate (DBP)

It is a gorgeous shade indoor and out. I was also excited that unlike the shades of the Spring collection, this Summer shade is unscented!

Thanks for looking!
Anutka :)


** Polishes were provided to me for review by the manufacturer or their PR. **
** For more information please see the disclosure policy **


Subtle Geometry...

Monday, July 22, 2013
This is a manicure from way, way back in April when I was first swatching and playing with the China Glaze Hologlam collection. I really wanted to try out stamping with these holos because I expected some amazing results. Although it did stamp well, the result turned was a lot more subtle than I anticipated. Of course subtlety has it's charm as well so I still enjoyed the mani...


I started out with a base of China Glaze Cosmic Dust on all except for the thumb and pinkie fingers where I used China Glaze Strap on Your Moonboots. For the stamping, I used Strap on Your Moonboots and Gals stamping plate GA46. Light blue rectangular rhinestones on the stamp-less fingers to complete the look...


Although my nails were fairly short at the time, they were still a bit too long for the Gals full nail images. There is a small gap in the stamping toward the cuticles which is not too noticeable here, but drove me nuts in real life..


P.S. I finally broke down and joined Instagram last night, so come say 'hi' and follow if you want to! There is not much there so far, but maybe there is hope for me yet... :)


Thanks for looking!
Anutka :)


** Polishes were provided to me for review by the manufacturer or their PR. **
** For more information please see the disclosure policy **