Showing posts with label Stamping. Show all posts

PolisHaus Spectrum Snowflakes...

Tuesday, November 26, 2013
Hi! Today I would like to show you some quick nail art that I created while swatching the PolisHaus lacquers last night. I really couldn't resist adding snowflakes over this periwinkle blue beauty. The combination of the two really put me into the winter mood. Might as well get into the mood since it has been really cold lately and the weatherman is threatening snow next week...


For this manicure I started out with a base of PolisHaus Spectrum. I stamped different snowflakes from Cheeky Jumbo plate L (aka K2) using Pure Ice Silver Mercedes. If you are looking for this plate on Amazon or the Cheeky website, it is listed as 'K2', however, on my actual plate it says 'L' which is why I'm not sure what to call it. Regardless of what you call it though, it is full of beautiful holiday themed images including a variety of snowflakes...


This stamping plate was given to me by a friend earlier this year and I've been waiting patiently to use these snowflakes! I can't wait to stamp some of the other holiday images from the plate!


Spectrum glows a beautiful blue in the dark so I can enjoy the manicure even at night! I think it looks a bit like snow in the dark and works so perfectly with the snowflakes...


What do you think of this manicure? Are you ready for winter?

Thanks for looking!
Anutka :)


** PolisHaus lacquer provided to me for review by the manufacturer or their PR. **
** For more information please see the disclosure policy **

31DC2013 Day 5 - Blue

Thursday, September 5, 2013
It is already day 5 of the 31 Day Nail Art Challenge. The theme for today is blue and I couldn't resit doing some nautical nails. This has been on my to do list for a while and like most things on that list, it is hard for me to find the time to do it. This challenge has been a great motivation so far to actually make time and attempt the ideas floating around in my head...


The base of this manicure is Zoya Sailor from the Cashmeres collection. With a name like Sailor, it just couldn't be more perfect as a base. I stamped the wheels from Cheeky plate CH49 using Maybelline Bold Gold. This is actually a full nail image, but I chose to use just sections of it in random areas of the nails. The ship is also from the CH49 plate and stamped using Essence Stamp Me! White. Using a small detail brush I painted the ship silver...


I'd love to know what you think of this manicure! Comment below :)

Thanks for looking!
Anutka :)


** Polishes were provided to me for review by the manufacturer or their PR. **
** For more information please see the disclosure policy **

Gone Hexy...

Friday, August 9, 2013
I'm not sure what it is that compels me to incorporate studs into stamping, but I've attempted to do it again. While I have already shown you some of the round studs from the Winstonia nail stud wheel, today I would like to show you the larger hex pieces which I have been eyeing since I first got these studs. Of course I paired them with a matching hex stamping pattern...


For this manicure I started out with a base of Zoya Louise from the new Fall collection. It is a beautiful rich chocolate cream shade. I stamped the hex pattern from Winstonia plate W113 using my favorite new stamping gold, Maybelline Bold Gold. I then placed a couple of gold hex nail studs over the filled in areas of the pattern. Although I usually don't like to top coat over studs, since these are larger pieces that I wanted to lock in place, I did apply a top coat over the whole manicure...


These hex studs are 4.5mm in diameter (between two points). The set contains both gold and silver hex studs in addition to lots of other fun shapes such as teardrops, hearts, squares, triangles and more...


I wish the stamping gold and the gold of the studs was the same shade so it would be even further incorporated, but maybe that's just crazy talk...


Here is the photo of what the Winstonia nail wheel, Design #3 looks like. It comes with a fun mix of different shaped metal rhinestones...


If you are interested in purchasing these, Winstonia was kind enough to create a discount code for me to share with you. You can use the code WACKYLAKI for 10% off. The code applies only to the following items: tweezersstuds set design 2studs set design 3 and is valid until August 31st, 2013.


I liked this mani a lot more in person than I do in photos, but that's just how it goes sometimes.
In any case, what do you think... can I pull of the larger studs? I generally tend shy away from them :)

Thanks for looking!
Anutka :)


** Polishes were provided to me for review by the manufacturer or their PR. **
** For more information please see the disclosure policy **

Sunday Stamping: Flowers

Sunday, March 24, 2013
Despite the snowfall that fell over Seattle last Thursday night (and melted by Friday afternoon), I think it is safe to say that most people are ready for Spring. Ready to put away the warm clothes, enjoy the sunshine, and watch everything start to bloom. This week the Sunday Stamping challenge of flowers is just right for the mood...


The base of this manicure is Color Club Eternal Beauty from the Halo Hues collection. I am absolutely smitten with this polish and the rest of the Halo Hues collection. I stamped the flower pattern from Dashica SdP-O plate using OPI Vant to Bite My Neck?. I really didn't expect it to stamp so well, but decided to give it a try and it really surprised me...


I accented the ring finger with two Swarovski rhinestones. Since I didn't want to use a top coat and dull the sparkle of them, I attached them with a bit of nail glue. These things are not going anywhere...


There was a bit of sun shining through the clouds, so I took the opportunity to snap a few photos outside...


I could just stare at the holo all day...


As I was writing this post, I realized that I used this stamp for a Sunday Stamping gemstone challenge last year. Still just as crazy about this pattern now as I was back then :)

Thanks for looking!
Anutka :)


** Polishes were provided to me for review by the manufacturer or their PR. **
** For more information please see the disclosure policy **


Shimmer Cristina Stamped with Nicole by OPI Personally Speaking...

Wednesday, November 28, 2012
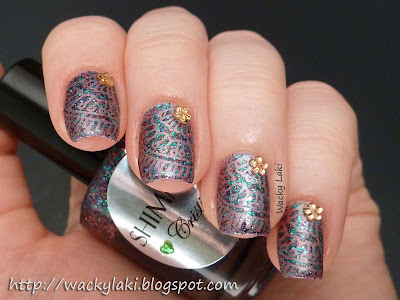
I have really mixed feeling about this manicure, but decided to show it to you anyway. It is not horrible, but certainly not what I had hoped for. The stamping turned out to be much too subtle and lacks that pop that I wanted. On the other hand sometimes subtle is nice, so maybe you can help me decide... :)


I started out with a base of Shimmer Cristina which I showed you yesterday. It is a beautiful mix of green and red glitter in a tinted jelly base. For the stamping, I wanted to try out Nicole by OPI Personally Speaking... from the CVS exclusives this fall. It worked really well for stamping and I will certainly be trying it over other bases for more contrast...


The stamping image comes from the Cheeky jumbo plate C. This plate has so many gorgeous images that I want to try, that I have a hard time deciding which one to use...


I accented it with a little flower rhinestone in yellow for a bit of contrast and fun...


Let me know what you think of this! Good? Bad? Don't care either way?...

Thanks for looking!
Anutka :)


** Polishes were provided to me for review by the manufacturer or their PR. **
** For more information please see the disclosure policy **

Tutorial: Mirror Image Stamping

Monday, September 3, 2012
As promised yesterday I have a quick tutorial to share with you on how to stamp a mirror image using the stamper to stamper method. I will preface this by saying that this is not a tutorial for the full manicure, just the stamping technique. Also, it assumes that you already know how to stamp and stamping basics are not covered. If you do not know how to stamp, but would like to learn, I would highly recommend the Getting a Good Stamp Image tutorial from soguesswhat11. Now on to the tutorial...


Tools:
  • XL Stamper (it has different, softer/stickier stamping pad)
  • Regular Stamper such as Konad or Salon Express (used here)
  • Desired stamping plate (BM03 used in this example)
  • Stamping polish (Sally Hansen Insta-Dri Jumpin' Jade used here)
Steps:

Instructions:
Please note you have to work pretty quickly for this to stamp well or the polish will dry and not transfer.
  1. Pick up image into XL stamper
  2. Transfer the image onto second stamper by pushing them together straight on
  3. Image should now be on the second stamper (reversed)
  4. Stamp onto nail 
  5. Reverse image (left) next to regularly stamped image (right)

See how quick? I love this technique and hope you find it useful as well!
Let me know what you think of this tutorial or if you have any questions :)

P.S. If you have never heard of an XL Stamper, take a look at this video to see it in action. It can be purchased from Ninja Polish or ebay by searching for "XL Stamper."

Special thanks goes out to Diana of the blog D.I.A.N.A. for introducing me to this technique! Make sure to take a look at her blog for some amazing manicures :)

On a final thought, is anyone interested in me trying to make a basic stamping tutorial?

Thanks for looking!
Anutka :)

Fashion Friday: Fall Into Red...

Friday, August 31, 2012
I've got a fashion inspired manicure for you today. This is inspired by a Jenny Packham dress right of the Fall/Winter 2012 runway. Please don't be fooled, I have no idea what I'm talking about. I am really not someone who keeps up with current fashion or what's hot on the runways. This dress just caught my eye on Pinterest and I turned to trusty Google to clue me in on the designer. I figured it was perfect to go along with a shade from Zoya's runway Diva collection...


For the base of the manicure I started out with Zoya Anne, which I really should have reswatched while I was at it, but I got too caught up. It is a nice nude shade with a hint of shimmer. I stamped using Wet 'n Wild Black Cream and Bundle Monster plate BM-201 for the little curls. Leaving a few areas exposed, I painted the rest with Zoya Elisa*, a gorgeous crimson red.


I hope you like it! Let me know what you think of it :)

Thanks for looking!
Anutka :)


** Polishes marked with an asterisk (*) were provided to me for review by the manufacturer or their PR. **
** For more information please see the disclosure policy **

OPI Luxurious and Indugence Flames

Thursday, August 16, 2012
I wonder if anyone else had a strong urge to create a gradient using OPI Luxurious and Indulgence. I wanted to snatch them right out of the press release to try this. The intention was an orange to red gradient that would be a perfect backdrop for a sunset manicure. The gradient didn't turn out I had envisioned and I'll show you why, so instead of a sunset, I went with flames...


I stamped the flames using Wet 'n Wild Black Creme and Mash plate Mash-48 over the gradient. The stamp was a bit too heavy at the tips so I carefully smudged some of it out with lint-free (very important) cotton and acetone. That seemed to really light a fire under the flames...


In a perfect world this stamp would be the inverse of itself. I want it to stamp the outside and leave the flames empty. That would give a lot of flexibility in creating different gradients and blocking out the rest. Similar to what I tried here! Much easier than starting with a black base and stamping with red/orange/yellow/etc to get the same look...


Here is what I mean when I say the gradient did not turn out as I planned. I started out with a base of Luxurious (as shown on the nail on the right) and applied OPI Luxuirous and Indulgence to the sponge (Luxurious on top, Indulgence on the bottom). When I sponged it on, the gold from both transferred, but the base color was left behind. It appeared as though I just sponged gold onto the tips of Luxurious. Not what I expected, but I love it!...


I kept sponging on just OPI Indulgence to the tips and after the sponge was saturated with base color a tiny bit of it did transfer (see the reddish stripe in the middle?). Even with that, it was mostly the gold flecks that I saw on the nail...


Have you ever tried sponging with a fleck filled polish? Did it turn out as you had planned?

Thanks for looking!
Anutka :)


** Polishes were provided to me for review by the manufacturer or their PR. **
** For more information please see the disclosure policy **

Ulta Concrete Evidence Stamped with Barielle Surf's Up

Thursday, August 9, 2012
As soon as I swatched Barielle Surf's Up*, I knew I had to try to stamp with it. My first thought was that it would work perfectly stamping over white to create a nice traditional porcelain china look, but I ended up going a slightly different way. As you might know, I tend to inject a bit of gray into my manicures. Maybe it is the gray Seattle weather, maybe it is to match my mostly black/gray wardrobe, maybe just my personality. Whatever it is, I like it and I'm sticking with it and I hope you don't mind...


I started out with a base of Ulta Concrete Evidence, a new gray in my growing collection. I stamped it with Bundle Monster plate BM-322 using Barielle Surf's Up as my stamping polish. As anticipated, it is so pigmented that it worked perfectly for stamping for which I was pretty excited...


This pattern and color combo makes me think of a nice fall coat...


Ulta Concrete Evidence is a soft gray cream. It has a nice smooth formula with full coverage in just two coats. The latest Ulta polishes seem to have a slightly flattened/widened brush, which I found very easy to use. It is a nice improvement, although I didn't have problems with their old brushes either. These swatches are with no top coat...


Swatch Details
Brand: Ulta
Collection: main line
Color Name/Number: Concrete Evidence
Number of coats: 2
Top Coat: No

Free of Formaldehyde, Toluene, Dibutyl Phthalate (DBP)

Thanks for looking!
Anutka :)


** Polishes marked with an asterisk (*) were provided to me for review by the manufacturer or their PR. **
** For more information please see the disclosure policy **