A little while ago I received and invitation to participate in a nail art contest for Wish. It is a clothing boutique that asked nail bloggers to create a manicure inspired by their collection. Although I didn't intend to participate because I don't particularly like popularity style contests, I still thought it would be fun to try my hand at interpreting one of their looks from the Butterfly Effect collection...
A few things in this outfit caught my eye, the sheer stringy mesh at the top and the contrast in finish between the top and skirt. I'm not sure I captured them well enough, but the idea was there. I used acrylic paint and a small detail brush to draw the stringy detail at the base of the nail. Then, using Zoya Dovima, a matte black, I painted about two thirds of the nail. I ran a stripe of top coat across the tip to create a slight contrast in the black....
What do you think, did I manage to capture the outfit inspiration in my manicure?
Thanks for looking!
Anutka :)
Showing posts with label Matte. Show all posts
Sunday Stamping: Inspired by Shoes...
Sunday, April 28, 2013 at 8:36 AM
Today's Sunday Stamping challenge in Adventures in Stamping is to create a manicure inspired by a favorite pair of shoes. None of the shoes that I own have stampable (let's pretend that's a word) patterns, so I resorted to finding a "favorite" pair online. Luckily, nowhere in the challenge did it mention that I had to own the pair of shoes that inspired me. Since my nails are long enough to flash their underside that could only mean one thing...
... Louboutin! The shoes with the red soles have inspired more than one manicure creation on this blog and I'm sure will continue to do so. In fact, I already have a few others lined up for replicating some day. Today's manicure was inspired by this wild pair...
To create this look, I started out with a base of Color Club Earthy Angel from the Back to Boho collection. I sponged over it with Color Club Positively Posh from the Untamed Luxury collection to create a mottled look at the tips. Then I stamped the leopard print with Wet 'n Wild Black Creme using Mash plate Mash-40.
Using Liquid Palisade, I blocked off the tips where I wanted to protect the stamping and painted the rest of the nail using Black Creme. After removing the Liquid Palisade, I finished off the tips with loose gold glitter and a matte top coat over the leopard print... How is that? Clear as mud?
I love how this turned out, but I wish I would have skipped the glitter just left it as leopard print on the tips. I'm not a bit fan of how the gold tips look on the shoes and should have taken the liberty of leaving them off the manicure as well. Maybe next time I'll remember to stop while I'm ahead.. :D ..
I little collage just because I just couldn't help myself :)
Thanks for looking and commenting!
Anutka :)
** Polishes were provided to me for review by the manufacturer or their PR. **
** For more information please see the disclosure policy **
Barielle Sweet Treats, Striping Tape and Matte-inee
Monday, March 4, 2013 at 8:59 AM
I had quite a bit of fun playing with striping tape and a few of the beauties from the Barielle Sweet Treats collection. The resulting manicure is something that I have been wanting to try for a while and I am loving the result. It feels a bit like the cold gray winter transitioning to spring...
For the manicure I started out with a base of Barielle Banana Drop and after applying striping tape, I sponged over it with Barielle Green Apple Chew and Lilac Jelly Bean. This is my second attempt at the manicure. For the first one I tried to sponge a gradient of three colors with Banana Drop in the middle and it didn't quite look right. I really like the murky transition between the grayed out lilac to the bright chartreuse...
To experiment a bit more, I added Barielle Matte-inee. I generally love the look of a matte mani and this is no exception. It adds a nice softness and velvety feel to the final look...
In the bottle Barielle Matte-inee looks peachy, different than any other matte top coat that I have tried before. It is filled with strengtheners and conditions and meant to be used either alone or over polish. When used alone it provides strength and protection without the shine. Over a colored base it works as a matte top coat as seen in the photos above. In comparison to other matte top coats, it doesn't dry as fast, but it provides a softer, gentler matte appearance which I really like...
Spoiler alert for anyone still reading... I'm working on a tutorial for this manicure...
Thanks for looking!
Anutka :)
** Polishes were provided to me for review by the manufacturer or their PR. **
** For more information please see the disclosure policy **
Sunday Stamping: Red & Black
Sunday, July 29, 2012 at 8:41 AM
It is Sunday Stamping again in the group Adventures in Stamping and this week the challenge is "red and black," which was the perfect opportunity to try this manicure. I've tried it once before, but the stamp didn't turn out well so I never posted about it. I'm excited that this time it turned out much better and I can show it to you. Also, before I go on with the post, I want address a question I had last week. The stamping group where these challenges come from welcomes all stamping enthusiasts regardless of your skill level so please don't hesitate to join if you are interested!
For this manicure, I started out with a base of three coats of Zoya Rekha , a lovely red, slightly dusky jelly cream. I then stamped using Wet 'n Wild Black Creme and Bundle Monster plate BM-209. The stamp pattern does not have a straight edge which kind of gave me trouble with aligning them evenly on all the nails. With the image being smaller than a full nail stamp, I stamped it closer to one side of the nail and painted the unstamped part of the nail black using acrylic paint. The wavy line from the stamped pattern was my guide for the split....
I chose to use Essie Matte About You over the regular top coat to create the matte effect and I love how it turned out...
Just for fun, here is what the glossy version looked like before I applied the matte top coat. I still like it, but I definitely like the matte version better...
I'd love to know your thoughts on this :)
Thanks for looking!
Anutka :)
Black and White Challenge Day 8 - Sponging
Thursday, March 22, 2012 at 8:38 AM
It is day eight of the Black and White Challenge which means a sponged manicure. I had in mind a marble or granite look, so I turned to the internet for inspiration, as I often do. Somehow it helps to have a picture to stare at as I work. While searching for black and white stone, I stumbled upon a photo of Emma Stone in a black and white dress that I just couldn't resist...
I started out with Borghese Tempesta Black (swatches below) and then using a corner of a cosmetic wedge, I sponged on white acrylic paint. As I was working on the manicure I decided it probably would have matched the dress more if I had started out with a white base and sponged with black. This led me to wonder if a zebra is really white with black stripes or black with white stripes, but I digress. I will have to try a black over white version of this at some point...
Just as I was done editing all the photos, I remembered that I finally got my hands on a bottle of Essie Matte About you, so I added the matte topcoat at the last minute to match the satin look of the dress. I love how it turned out. I hope you don't mind if I matte everything from now on. :D
Here is the shiny, regular topcoat version. I though I would share these since I already had them done and ready to go. Plus, I do like the shiny version as well. Which do you prefer, matte or glossy? :)
Borghese Tempesta Black
A black base with a fine silver shimmer. Application was perfect, I love the wide brush. Two coats for full coverage. This is very similar to Essence I Love My Jeans that I used just a few days ago, except that the shimmer in Tempesta Black is a bit larger.
A close up to see the shimmer...
Don't forget to check out all the other lovely ladies participating in the challenge...
Biba's beauty corner , Biberlee-Džumbus, Colores de Carol, Emerald sparkle, Hooked on polish, Lacquered Tips, Mateji ustvarjata, My Little Vanities, My Nail Grafiti, Nail crazy, Oje Gemisi Kalkiyor, Omgnoodles, Pink Polish Addict, Polish nail art, Purple Glitters, Taya, The Nail Buff, Welcome To Brianna's World!
Thanks for looking!
Anutka :)
Emma Stone photo Source
I started out with Borghese Tempesta Black (swatches below) and then using a corner of a cosmetic wedge, I sponged on white acrylic paint. As I was working on the manicure I decided it probably would have matched the dress more if I had started out with a white base and sponged with black. This led me to wonder if a zebra is really white with black stripes or black with white stripes, but I digress. I will have to try a black over white version of this at some point...
Just as I was done editing all the photos, I remembered that I finally got my hands on a bottle of Essie Matte About you, so I added the matte topcoat at the last minute to match the satin look of the dress. I love how it turned out. I hope you don't mind if I matte everything from now on. :D
Here is the shiny, regular topcoat version. I though I would share these since I already had them done and ready to go. Plus, I do like the shiny version as well. Which do you prefer, matte or glossy? :)
Borghese Tempesta Black
A black base with a fine silver shimmer. Application was perfect, I love the wide brush. Two coats for full coverage. This is very similar to Essence I Love My Jeans that I used just a few days ago, except that the shimmer in Tempesta Black is a bit larger.
A close up to see the shimmer...
Swatch Details | |
![]() | Brand: Borghese Collection: Main Line Color Name/Number: Tempesta Black, B370 Number of coats: 2 Top Coat: Yes Free of Formaldehyde, Toluene, Dibutyl Phthalate (DBP) |
Don't forget to check out all the other lovely ladies participating in the challenge...
Biba's beauty corner , Biberlee-Džumbus, Colores de Carol, Emerald sparkle, Hooked on polish, Lacquered Tips, Mateji ustvarjata, My Little Vanities, My Nail Grafiti, Nail crazy, Oje Gemisi Kalkiyor, Omgnoodles, Pink Polish Addict, Polish nail art, Purple Glitters, Taya, The Nail Buff, Welcome To Brianna's World!
Thanks for looking!
Anutka :)
Accidentally in Matte...
Thursday, April 28, 2011 at 12:41 PM
I saw this tutorial from from 
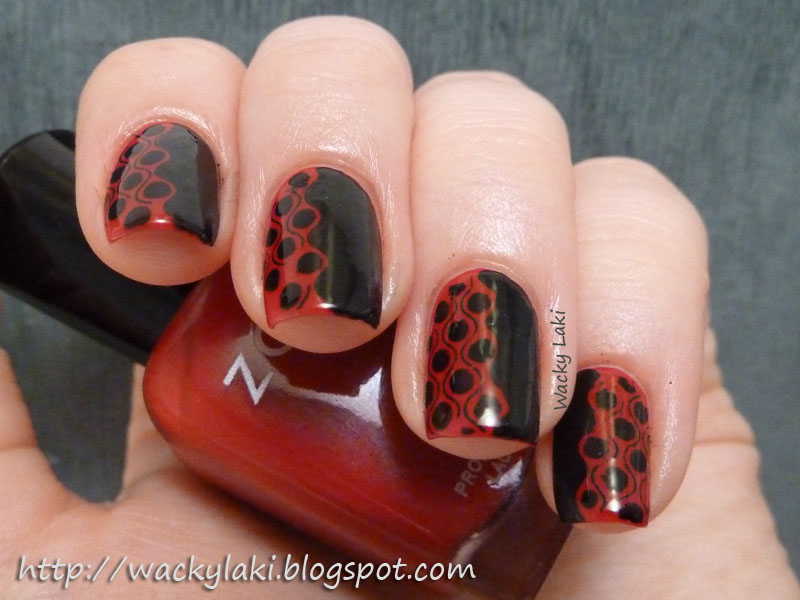
Confessions of a Polishaholic. For some reason I just had to try it. The tutorial recommends using a light color as a base, but I already had the Wet n Wild Caught Red Handed on... Plus, I thought that black print on a red polish would actually look good. So I gave it a try.
Sadly none of the print actually transferred, but what I end up with was a matte nail. I tried it on a few other nails with the same result. I choose to blame my flop on the topcoat. I will definitely have to try this technique without the top coat on and see if the text actually transfers. :)
Left hand - ring and pinky fingers matted, index and middle finger original w/topcoat...
Right Hand - middle finger is matte, ring finger original w/topcoat...
This is by no means the most obvious matte effect. It just caught me by surprise, so I thought I'd share. I have yet to try the matte topcoats that are available, but from swatches I have seen they produce a much stronger effect.
If you want a slight matte effect and want to try this, here is what I did:
1. Cut out squares out of the newspaper that are slightly bigger than the nail.
2. Fill a small container with rubbing alcohol (the tutorial recommends vodka or spirit, but who wants to waste that???)
3. Soak nails for a few minutes in rubbing alcohol until they are nice and wet. Apply the newspaper squares to the nail and hold for at least 30 seconds
5. Remove the newspaper and there you have it... matte nails
6. If you were lucky enough to get some of the print to stick, but didn't want it, you can just rub it off.
Some questions to ponder and things to try... if one was to use colorful tissue paper, would the color transfer? Could one crinkle it and make some cool effects? Could one print images from the computer and transfer them to the nail? Hmmm...
Thanks for reading :)
Anutka
Subscribe to:
Posts (Atom)