Wacky Laki Turns One!

Friday, April 20, 2012
It was exactly one year ago on April 20th that I wrote my first Wacky Laki post. I still remember trying to pick out a name for the blog and with my boyfriend's help we came up with Wacky Laki. In case you were wondering what the name means... Laki (лаки) means polishes in Russian and it just happens to rhyme with Wacky. So there you have it :)


I really don't know what possessed me to start this blog, but looking back at that first post, my goal was to swatch my stash, make some frankens and take better care of my nails. My original "stash" of ~25 polishes has long been swatched, but in the process it grew to more than 500, so you could say that I'm still working on it... My nails are in much better shape, but still have those awful days when I'm too embarrassed to even show them. I have only made a few frankens, but still hope to get to some day...

It is fun to look back at old swatches just to see how far I've come...

April 2011
April 2012

Instead of trying to recap a year worth of swatches and nail art in this post, I have started a Pinterest account for this blog. You can find it here. I thought it would be a great way to organize and sort swatches and nail art into categories. In an effort to make it complete (because I'm nuts that way), I have been going through old posts and pinning them...

However, looking at old swatches lead me to this...
(adapted from source)

and then...
(adapted from source)

So I might re-swatch some polishes when I use them again, but certainly not going to redo a year's worth. I might be wacky, but I'm not crazy! ;)

All I can say is that this blog has surpassed my expectations 100 fold. I have learned so much about polishes, ingredients, different finishes, clean up, stamping, watermarble, sponging, freehand nail art and the list goes on and on. I started the blog thinking it would be a sort of electronic diary for me. I didn't expect even one follower, let alone more than 800! I'm still in shock that so many of you choose to follow and read/look at this blog! If it was not for your lovely comments and encouraging words, I would have given up on this blog a long time ago...

Thank you for all your support this past year and I hope you will stick around for whatever comes next!

Anutka :)

piCture pOlish Tiffany Boxed Up

Thursday, April 19, 2012
The last piCture pOlish in my collection is Tiffany. It carries the very appropriate and cute tag line of "diamonds with breakfast!" With a name like that, there wasn't a doubt in my mind that I wanted to put a ribbon and bow on this manicure.


For the ribbon I used striping tape in white and silver. The white alone turned almost clear on the nail so I layered it over silver striping tape. The bow provided a bit more of a challenge since I didn't want to paint it and stamping just wasn't going my way. I ended up cutting out part of a butterfly sticker and using it as a bow. Have no fear though, no real butterflies were harmed in the making of this manicure.

I'm really happy with how this turned out. Too bad I don't own a real Tiffany box to take photos with... ;)


A quick shot of the stickers that I used. The red lines over one of the butterflies shows where I cut to turn it into a bow. Also in the process of taking photos I discovered that these stickers glow in the dark! Yay! :)


piCture pOlish Tiffany itself is a cool mint creme. It actually has a bit more of a green tint than the camera captured. Thee coats for full opacity and the formula was easy to work with. Swatches here are with a top coat...


Swatch Details
Brand: piCture pOlish
Collection: main line
Color Name/Number: Tiffany
Number of coats: 3
Top Coat: Yes

Free of Formaldehyde, Toluene, Dibutyl Phthalate (DBP)

I would love to know what you think of this! :D

Thanks for looking!
Anutka :)

Tutorial Tuesday: DIY Cutout Decals

Tuesday, April 17, 2012
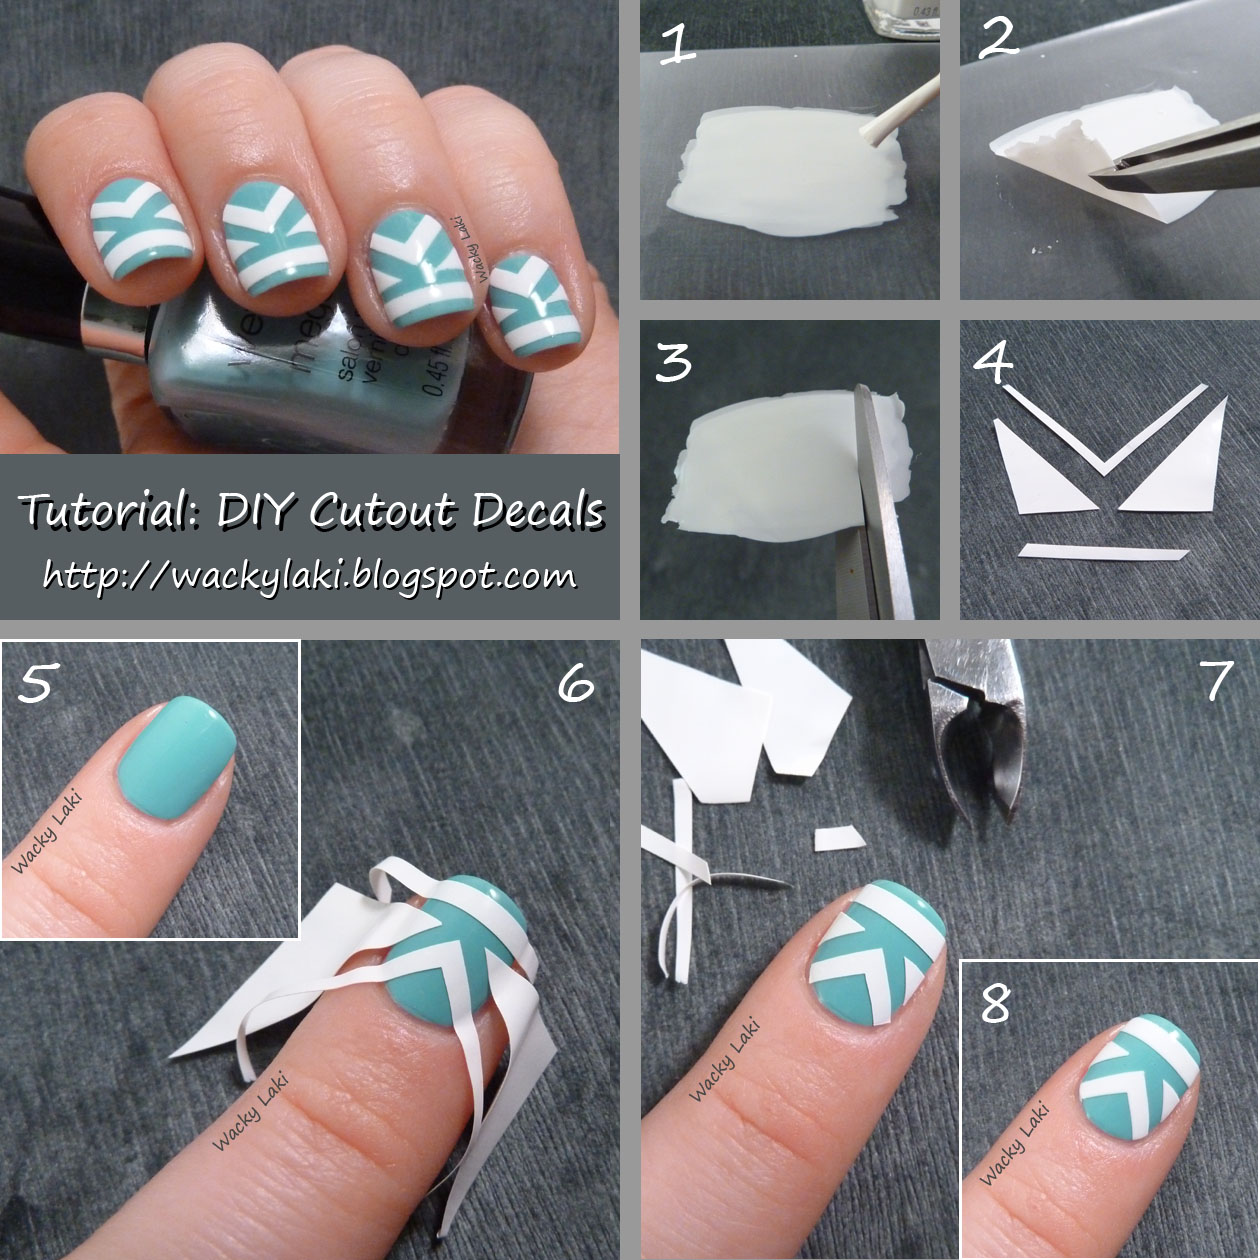
As promised, I have a tutorial for the dress inspired manicure from last Friday. This is made with a technique that I have been playing with for a while and involves nothing more than some nail polish and a ziplock bag. I think the possibilities with this technique are endless. These cutout decals are just one example of what you can do...

Supplies
Steps

Insutrctions
  1. Using white nail polish, paint a rectangle about 1.5x larger than your nail on the ziplock bag.
    - Apply a second coat if needed to reach full opacity.
    - Allow to dry completely (I usually let this dry overnight)
  2. Peel the sheet of nail polish off the ziplock bag. Sometimes it helps to use tweezers to get it started, but it should peel off easily once a corner is lifted.
  3. Using scissors, cut out the decals as shown above
  4. The cutout decals should look approximately as shown in Step 4.
  5. Apply desired number of base color coats.
  6. When the polish is still slightly tacky, but not wet, apply the decals to the nail as shown above.
    - If you are starting out with an existing manicure that is already dry, apply a coat of clear polish and allow it to get tacky for decal application...
    (Please excuse the extra large decals I created... they certainly don't have to be this big :) )
  7. Using cuticle nippers, clip the decals as close to the cuticles as possible
  8. Clean up the edges as needed. If you didn't clip as perfectly as you wanted, take a look at the cleanup tutorial on how to get a clean line near the cuticle. Since the decals are made of nail polish, they should easily dissolve and clean up with acetone/nail polish remover...
  9. Apply a top coat and enjoy :)

I hope you enjoyed this tutorial! I would love to know what you think of it...

As always, if you try this or any of my other tutorials/manicures, I would love to see your creations :)

Thanks for looking!
Anutka :)