Showing posts with label Tutorial. Show all posts

Tutorial: Chevron Skittles

Tuesday, November 12, 2013
I got a few requests to do a tutorial for my Chevron Skittles manicure from last month. Dutifully I added it to my 'to do' list, which is about a mile long these days. Then I got to thinking that I might be able to show you how I created this manicure using the photos that I already have if you are willing to use your imagination. This really isn't my proudest moment and I still hope create a proper tutorial one day, but to avoid further delay I hope this will help those who wanted to recreate this look...

Supplies:
  • 3 polishes of your choice (OPI Miss Universe lacquers used here)
  • Striping tape
  • Small brush (optional, but helpful)
Steps:


Instructions:
  1. Start out by painting the nails using one of the polishes. OPI I'm Feeling Sashy used here.
    - When the polish is dry, place striping tape in a desired pattern (placement of striping tape illustrated here with gray lines). 
  2. Using either the polish brush or a different small brush, apply your second color in sections between the striping tape. Shown here using the silver OPI This Gown Needs a Crown.
  3. Repeat step #2 using the third color to fill in other sections between striping tape. Shown here using OPI Miss You-niverse.
    - Note: I did remove two pieces of striping tape on the index finger before adding the dark purple at the tip.
  4. Remove striping tape right away, while polish is still wet.
  5. Add a top coat and you're done!
For best results work one nail at a time rather than a full manicure as shown here. In other words, you can do step #1 to all the nails, but repeat steps #2-4 on each nail individually. It is best to remove the striping tape while the polish is still wet to get clean lines.


Please let me know what you think of this tutorial! Don't hesitate to ask questions if you have any!

Thanks for looking!
Anutka :)


** Polishes were provided to me for review by the manufacturer or their PR. **
** For more information please see the disclosure policy **

Tips for Removing a Double Sided (Louboutin) Manicure

Thursday, August 29, 2013
Ever since this OMG Viper Louboutin Manicure, I've gotten a lot of questions regarding the removal of it. I've done a tutorial on how to create a Louboutin manicure, but never realized so many of you would be worried about removing it. To save myself from having to explain, I thought it would be easier to just show you...

Supplies:
  • Acetone or polish remover (I use my own remover which just happens to be in a pure acetone bottle that is in this photo)
  • Cotton  or felt squares. Felt is a bit sturdier and what I always use for my polish removal. You can see how I make my felt pieces here...
  • An orange stick or something sturdy and thin to wrap the felt around
  • A cleanup brush. This is the same one I use for my manicure cleanup

Steps:


Instructions:
  1. Remove the polish off the top of the nail as usual
  2. Wrap a piece of felt around an orange stick and place underneath the nail. Hold it there for a few seconds to dissolve the polish and then gently rub back and forth to remove the polish. Re-position the orange stick to a clean area on the felt (or take a new piece) and repeat as necessary.
  3. Optional: As you can see the nail is pretty much clean, but if there are some spots you can't get to with the orange stick, take a brush soaked in acetone and run along the underside of the nail.
All done! Nakie nails :)

Although there are a lot of photos here, it really is fairly easy to remove the polish under the nail. I might add it is much easier than removing glitter off the top of the nail ;)

When doing a Louboutin manicure, make sure to use a non-staining red polish. As you can imagine, it would be much trickier to remove if the polish stained the skin...

Okay, I think that about covers it, I hope you find this useful. Let me know if I missed something or you have questions!!

P.S. The green polish is Zoya Giovanna, the last thing I swatched last night. The red is OPI Danke-Shiny Red. Totally unintentional, but looks like a perfect Holiday Louboutin mani. I'll have to keep that in mind when December rolls around :)

Thanks for looking!
Anutka :)

Tutorial: Faded Glitter Flag

Tuesday, July 2, 2013
I am pretty pathetic when it comes to following through on creating tutorials. This is one was requested a year ago, after this 4th of July manicure. I actually made the tutorial a few months later, but it seemed out of place to post it with the holiday so far behind. Now with 4th of July just a couple of days away, it is the perfect opportunity to share this with you...

Supplies:
  • White base polished (Wet 'n Wild French White Cream used here)
  • Red glitter (OPI Gettin' Miss Piggy With It)
  • Blue glitter (OPI Gone Gonzo!)
  • White nail art polish or striping brush to use with any white polish
Steps:


Instructions:
  1. Apply desired number of coats of white polish
  2. As shown above, cover approximately two thirds of the nail at a diagonal with red glitter
  3. Apply the blue glitter to the remainder of the nail, toward the base
  4. Using a striping brush and white polish paint a stripe where the two glitters meet
  5. Paint additional lines over the red glitter, parallel to the first line
  6. Add a top coat and you are done!
That's all there is to it! Hopefully you can see how easy it can be and will give this a try yourself!


Thanks for looking!
Anutka :)

Tutorial Tuesday: Striping Tape and Gradient

Tuesday, March 5, 2013
Today I would like to share with you a tutorial for the technique used to create the striping tape and gradient manicure yesterday. If you read my spoiler alert at the bottom of that post, then you were probably already expecting this. It is a manicure that I think looks complicated, but is actually pretty easy to make. The fun part is experimenting with colors and tape placement for endless manicure possibilities. If you have not tried this technique yet, I hope this will encourage you to try it...

Supplies:
Steps:

Instructions:
  1. Apply desired number of coats of base color and allow to completely dry
  2. Cut and apply pieces of striping tape in a desired pattern
  3. Paint a stripe of each gradient color directly onto makeup wedge or sponge
  4. Gently tap the sponge over the nail moving it slightly back and forth to blend the gradient
  5. Repeat steps 3 and 4 by applying more polish to the sponge and gently tapping on the nail  for a second coat of gradient. This helps build color opacity for the gradient
  6. While the polish is still wet, carefully remove the striping tape one piece at a time
  7. Using a Q-tip clean the cuticles of excess polish.
    Tip: clean up any fine details with a brush as demonstrated here
  8. Add a layer of top coat (or two if the sponging is bumpy) and enjoy! 
As always, please let me know what you think of this or if you have questions!

Thanks for looking!
Anutka :)


** Polishes were provided to me for review by the manufacturer or their PR. **
** For more information please see the disclosure policy **

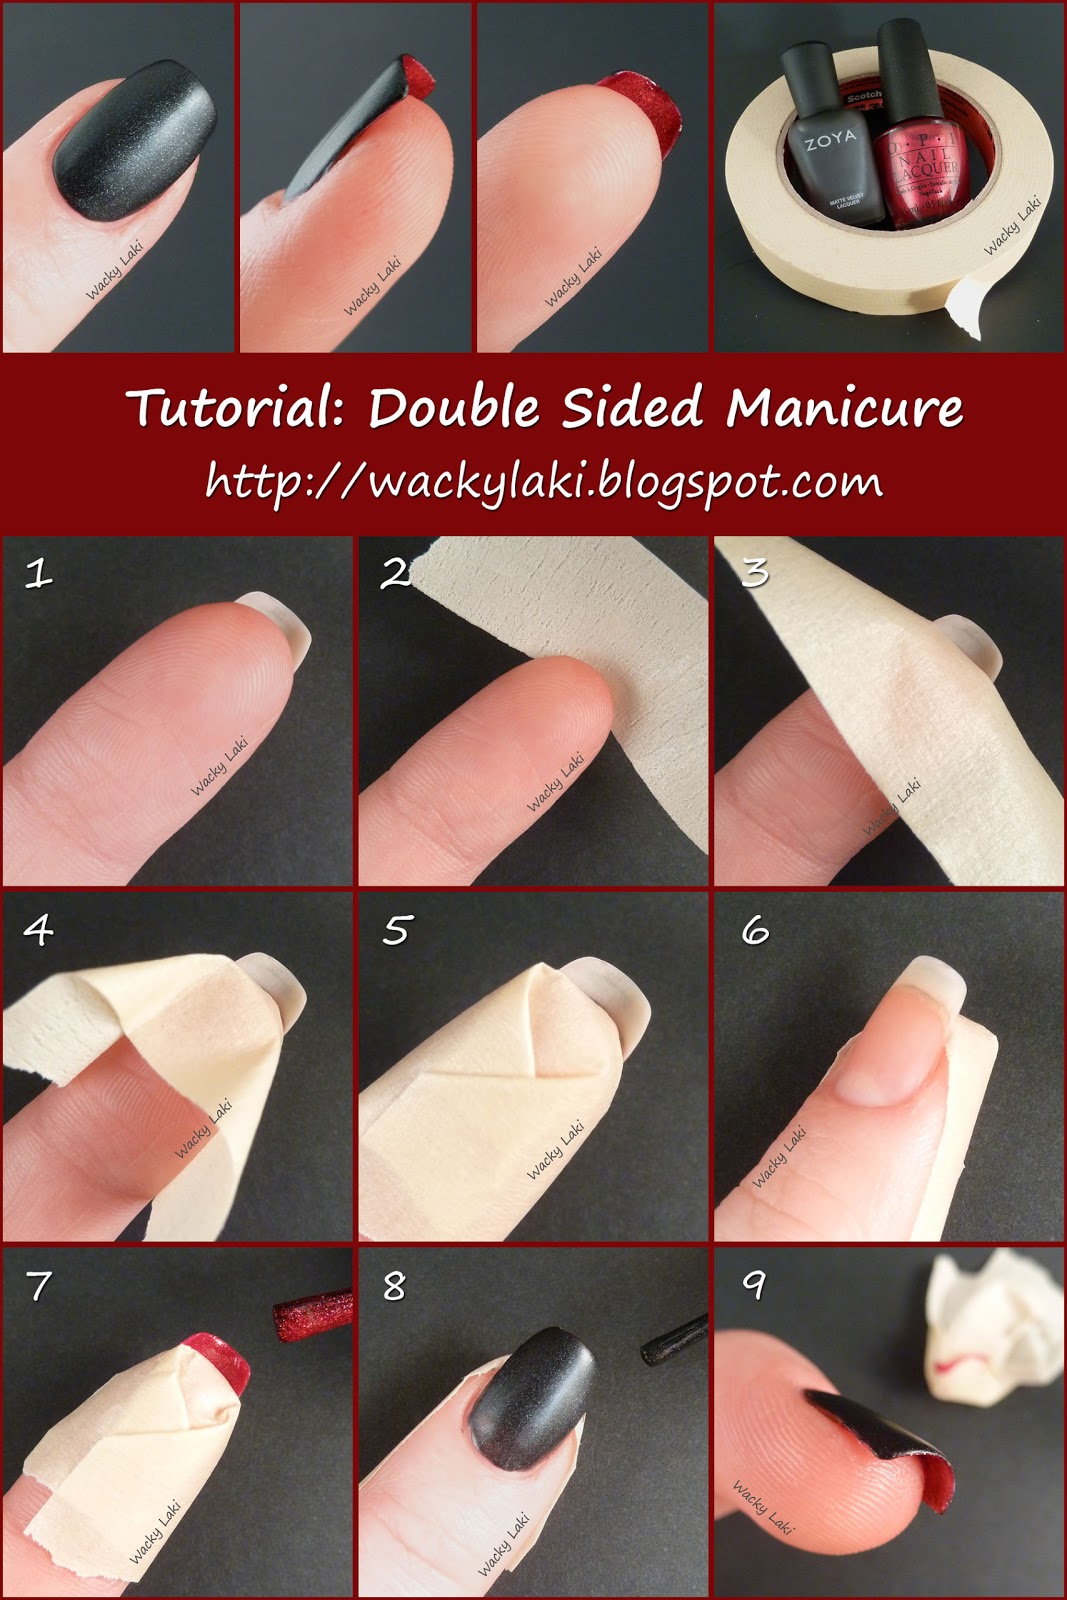
Tutorial Tuesday: Double Sided Manicure

Tuesday, November 20, 2012
I love the new trend of the double sided manicures. The most common are Louboutin manicures with a red underside, inspired by the red soles of Louboutin shoes. More recently OPI created the Bonded Look with the underside in gold, as seen in the new Skyfall movie. I think this can be fun in any color combination to make a statement or just have a little hidden treat for yourself.

Each time I do create of these manicures I get questions about cleaning under the nail after painting or people tell me that they are afraid to try and make a mess. I thought I would put together this tutorial to show how I tape off my nails to avoid the mess and make painting the underside of the nail a little easier. I hope you find it useful and give this double sided look a try...

Supplies:
  • Two polishes of choice. I'm using Zoya Dovima on top and OPI You Only Live Twice underneath.
  • Tape (clear tape, masking tape, painters tape, etc...)

Steps:

Instructions:
  1. Start out with clean dry nails
  2. Slip a piece of tape between the nail and the finger to run along the nail line
  3. Fold the tape down over the finger
  4. Fold the sides down along the finger, avoid covering the front of the nail
  5. Fold the two flaps down, one over the other, to keep them out of the way
  6. This is what it will look like from the side, a little tape hat for the finger.
    The front of the nail is not covered and the back of the nail is taped off and held away from the nail
  7. Paint the underside of the nail in chosen color. Repeat for a desired number of coats
  8. Paint the top of the nails in the desired color as usual
  9. Allow everything to dry and remove the tape. 
Enjoy your mess free double sided manicure!

Here are some examples of what I have done in the past. Click on the images to go directly to the post...


Let me know what you think of this and don't hesitate to ask questions if something is not clear!

Thanks for looking!
Anutka :)

Tutorial Tuesday: Nail Polish Stain Removal

Tuesday, October 16, 2012
I nearly had a panic attack yesterday when I discovered that my nails were stained neon pink after removing the gel manicure. I turned to a trick that I first learned about from Another Bottle of Polish?! and have been happily using ever since. This has saved my nails from all sorts of awful stains including yellow, blue and now pink. Hopefully you will find this quick trick as useful as I have...

Supplies:
  • Whitening Toothpaste
  • Nail Brush (or a toothbrush dedicated to nails...)

Steps:

Instructions:
  1. Remove as much polish and stain as you can with nail polish remover
  2. Apply whitening toothpaste to the nails and massage it in with your fingertips (pretty!)
  3. Using a slightly wet nail brush scrub the nails being careful not to damage them
  4. Rinse off the toothpaste. If needed, repeat steps 2 and 3 to further remove staining 
  5. Done! Treat your nails/cuticles to some nice oils to restore the moisture
NOTE: This works best for "fresh" stains right after removing the nail polish. It does not work well for removing set in yellow stains that develop over time from wearing dark polishes.

I hope you find this useful! I would love to know what you think of this or if you have used this method before!

Thanks for looking!
Anutka :)

Tutorial Tuesday: Tea Bag Nail Repair

Tuesday, September 18, 2012
I have an impromptu tutorial for you today on how to repair a nail tear using a tea bag. Over the weekend I accidentally hit my nail on something and a corner of it was left hanging on by just a few layers. I would usually file down damage such as this, but I really wanted to keep my nail length so I chose to repair it. Normally, however, I use this repair technique for damage that is further down the nail such as a tear along the nail bed (ouch!) and it works really well.

Supplies:
  • Tea bag
  • Nail glue
  • Scissors
  • Tweezers
  • Nail file/buffer
Steps:

Instructions:
  1. Cut out a piece of tea bag large enough to cover the damage. 
  2. Clean and prep the nail. You want to make sure to remove any polish, oils, lotions, etc. 
  3. Apply nail glue to the tear directly on the nail
  4. Place the tea bag piece on the nail and gently press it down so it lays flat against the nail.
    1. Wait for the glue to dry completely
    2. Add more glue over the tea bag and allow it to dry as well
  5. File or trim any excess tea bag hanging off the nail
  6. Gently file/buff over the glue and tea bag to smooth out sharp edges. Make sure not to file down any of the actual nail or tea bag which covers the tear. Filing too much will remove the tea bag and leave the tear unprotected.
  7. Apply base coat, polish and top coat as usual and you are done!

    I hope you will find this useful and as always I would love to know what you think!
    Have you tried this technique before?

    Thanks for looking!
    Anutka :)

    Tutorial: Geometric Confetti Decals

    Wednesday, September 5, 2012
    I'm not sure why, but I'm in a crazy tutorial making mood. I don't even have the patience to wait until a Tuesday and post it as a "Tutorial Tuesday" feature. Honestly, I was actually debating if I should post this since I've already done a nail decal tutorial, but I figure if I took the time to take photos, I better put it together and post it. Maybe it will be useful for someone. I've got a couple more planned and then I'll try to knock it off for a while :)

    This tutorial is for the geometric decals manicure that I posted for Polish Days yesterday...

    Supplies:
    • Nail polishes of choice. Used here Sally Hansen Celeb City (silver base), Wet 'n Wild Red Red, Color Club What a Shock! (green), Barielle Sunshine* (yellow) and Surf's Up* (blue)
    • Ziplock bag or sheet protector (my personal preference)
    • Scissors, hole punch
    • Tweezers
    • Cuticle nippers
    Steps:

    Instructions:
    1. Paint small strips of polish in multiple colors on a ziplock bag or sheet protector. Add a second coat if needed for sheer colors.
    2. Allow the polish to dry completely or overnight. Using tweezers, pick up an edge of the polish strip and peel off the plastic
    3. Using scissors cut out desired shapes (such as squares and triangles) from the nail polish
    4. The cut pieces will look something like this
    5. Using a hole punch, punch out circles in different colors. You can be the large office variety hole punch, it does not have to be a small craft one as I am showing here
    6. Optional: sketch out your nail shape and arrange pieces to get a pattern you are happy with. You can skip this step if you are not the type to plan (or over-think things as I do) :)
    7. Apply a base coat and your desired base color. Allow to dry. Sally Hansen Celeb City is shown here.
    8. Apply a coat of clear polish and when it is still tacky, but not wet, apply the decals in your desired pattern
    9. Using cuticle nippers, trim off excess polish around the cuticles, being careful not to cut yourself!
    10. Add a topcoat to seal in the decals and you are done! (I did add a few more confetti pieces after trimming, sorry if that confuses anyone...)

    I hope you enjoyed this tutorial. If nothing else, it is colorful and fun to look at (at least in my opinion)!

    I'd love to know what you think :)

    Thanks for looking!
    Anutka :)


    ** Polishes marked with an asterisk (*) were provided to me for review by the manufacturer or their PR. **
    ** For more information please see the disclosure policy **
    Tutorial: Mirror Image Stamping

    Monday, September 3, 2012
    As promised yesterday I have a quick tutorial to share with you on how to stamp a mirror image using the stamper to stamper method. I will preface this by saying that this is not a tutorial for the full manicure, just the stamping technique. Also, it assumes that you already know how to stamp and stamping basics are not covered. If you do not know how to stamp, but would like to learn, I would highly recommend the Getting a Good Stamp Image tutorial from soguesswhat11. Now on to the tutorial...


    Tools:
    • XL Stamper (it has different, softer/stickier stamping pad)
    • Regular Stamper such as Konad or Salon Express (used here)
    • Desired stamping plate (BM03 used in this example)
    • Stamping polish (Sally Hansen Insta-Dri Jumpin' Jade used here)
    Steps:

    Instructions:
    Please note you have to work pretty quickly for this to stamp well or the polish will dry and not transfer.
    1. Pick up image into XL stamper
    2. Transfer the image onto second stamper by pushing them together straight on
    3. Image should now be on the second stamper (reversed)
    4. Stamp onto nail 
    5. Reverse image (left) next to regularly stamped image (right)

    See how quick? I love this technique and hope you find it useful as well!
    Let me know what you think of this tutorial or if you have any questions :)

    P.S. If you have never heard of an XL Stamper, take a look at this video to see it in action. It can be purchased from Ninja Polish or ebay by searching for "XL Stamper."

    Special thanks goes out to Diana of the blog D.I.A.N.A. for introducing me to this technique! Make sure to take a look at her blog for some amazing manicures :)

    On a final thought, is anyone interested in me trying to make a basic stamping tutorial?

    Thanks for looking!
    Anutka :)

    Tutorial: Peel Off Base Coat

    Thursday, August 30, 2012
    I recently learned of this technique and while it is not my original idea I wanted to share a quick tutorial with you because it is just pure genius. Anyone who wears glitter nail polish will know what a pain in the behind it is to remove. Sure there are tricks to make it easier such as the foil method, but how great would it be to not have to soak your fingers in acetone? Essence recently came out with a peel off base coat which does just that. It didn't take long for those who tried it to notice that it bears a strange resemblance to craft glue... which leads me to this extremely cheap, simple and effective peel of base coat...

    Supplies:
    • Elmer's School Glue (washable, safe, non-toxic)
    • Empty nail polish bottle
    • Polish of choice
    • Cuticle pusher (optional)

    Steps:

    Instructions:
    1. Transfer some craft glue to an empty nail polish bottle and apply to clean bare nails as a base coat
    2. Allow the glue to completely dry. It will turn clear (slightly matte) and be non-sticky to the touch
    3. Apply any polish and topcoat as you normally would. Shown here is three coats of Shimmer Melissa with a topcoat.

    4. Enjoy your manicure! 

    5. When you are ready to remove the polish, take a plastic cuticle pusher (or just use your other nails) and starting at the base of the nail and gently lift the edge
    6. Continue to peel the polish off
    7. Tada! Removing glitter polish has never been this easy. Wash hands to remove and remaining glue residue and you are done!

    I will definitely be wearing glitter more often now! A little bit of waiting for the "base coat" to dry is nothing compared with the pain of glitter polish removal!

    How long does it last?
    That will depend on whether someone picks at their nails or not. Using the craft glue as a base coat will certainly not last as long as other base coats especially for those who pick at their nails. For those who are not pickers it can easily last for a few days. I've tried it a few times and it has lasted perfectly for a full day of wear until I chose to remove it. It easily survived through showers and dish washing which was my primary concern with a water based glue...

    Is it safe?
    Craft glue is safe and non-toxic. Children for generations have used this in schools, some I'm sure have even eaten it (although I would not recommend that). I will venture to say it is much safer than soaking your nails in acetone to remove glitter...

    Really brings back childhood memories of putting glue on my hand and letting it dry just to peel it off later...

    Have you tried this technique? Let me know what you think of this or if you have any questions! :)

    UPDATE: Gina of Soguesswhat11 did a fantastic test wear video of this technique. Take a look to see how it holds up to days of wear compared to a regular base coat and even basecoat under glue!

    Thanks for looking!
    Anutka :)

    Tutorial Tuesday: Olympic Rings Nail Decal

    Tuesday, August 7, 2012
    I have been glued to the TV every chance I get watching the Olympic Games, especially the swimming and gymnastics. It is incredible to see the athletes perform. I have also been so impressed with some of the manicures sported by the ladies. My own Olympic inspired nails featured a little Olympic rings decal on one of the nails. I thought I would put together a tutorial on how I made it. Hope you enjoy...

    Supplies:
    • Base color polish (I'm using Cosmetic Arts gold foil (no name))
    • Clear polish
    • Olympic ring corresponding colors: 
      • Blue (Barielle Surf's Up), Black (Wet 'n Wild Black Creme), Red (China Glaze Adventure Red-y), Yellow (Barielle Sunshine), Green (Sinful Colors Envy)
    • Ziplock bag or sheet protector
    • Ballpoint pen refill (ink cartridge)
    • Tweezers, Cuticle nippers
    Steps:

    Instructions:
    1. Using clear polish paint a small rectangle on the plastic bag. Allow it to dry completely for a few hours.
    2. Make a small puddle of nail polish on a disposable surface. Dip the end of the pen refill into the polish.
    3. Press the pen refill onto the clear nail polish square to create a circle
    4. Repeat steps 2 and 3 to create the first row of circles
    5. Repeat the steps again to create the second row. Go back over the first row with any colors you might wish to overlap.
    6. Allow the polish to dry then using tweezers peel the decal off the plastic
    7. Apply desired number of basecoats of polish. Allow the polish to dry until it is sticky (not fully dry)
    8. Place the decal in desired position on the nail
    9. Using cuticle nippers, trim off the excess polish along the cuticles. Alternatively you can trim off excess clear polish prior to applying the decal to the nail
    10. Apply top coat and you are done!

    I'd love to know what you think of this and don't hesitate to ask questions if something is not clear :)

    Thanks for looking!
    Anutka :)

    Tutorial Tuesday: Mirror Image Stamping Trick

    Tuesday, July 24, 2012
    I promised this tutorial more than a month ago and I'm really ashamed that it took this long, but I'll spare you the excuses. You can actually thank my boyfriend for motivating me to finally find the time to put this together. He started bugging me and asking me why I have not done something I promised to all my lovely readers. He even insinuated that I would never hit 1000 followers unless I got this done. Sheesh! Well I'm really, really, really thrilled to have reached 1000 followers last night and I got this done to boot! I can't even tell you how excited I am right now. Thank you everyone who reads my babble, follows this blog and takes the time to comment. You are certainly my motivation to keep this going. :D

    Before I get to the tutorial, I want to point out that this assumes you already know how to stamp. If you do not, there are a lot of wonderful tutorials online. One I always like to recommend is the Getting a Good Stamp Image tutorial from soguesswhat11.

    This tutorial is based on the emerald manicure which had one hand mirroring the other. I'm going to show you the trick I use to do that without having mirror image stamps available. Now on to the tutorial... 

    Supplies
    • Zip-lock (or any plastic) bag
    • Polishes: Clear polish, base color and stamping polish
    • Stamping supplies (Stamp/stamper/scraper)
    • Cuticle nippers
    • Cleanup brush & nail polish remover
    Steps
    Click on the image to zoom in...

    Instructions
    1. Using clear nail polish, paint rectangles slightly larger than the nail.
      - Allow the strips to dry for a few hours.
      - I make make these ahead of time and allow them to dry overnight so they are dry enough to peel off easily
    2. Stamp the desired image on to the clear polish strip
      - I'm using Mash plate Mash-46
    3. Using tweezers, gently peel the strips off the plastic bag
    4. Apply desired number of base color coats.
      - I'm using two coats of Ulta Green with Envy followed by one coat of Barielle Budda-Ful
    5. Stamp directly onto the nail for the nails you want to have the image as it appears on the stamping plate.
      - For example, I stamp the nails on my left hand directly from the plate onto the nail (as shown above on my index finger)
    6. For the nails you want the mirror image, apply a coat of clear polish and allow it to get sticky, but not completely dry. Flip the stamped nail polish strip with the stamped side down and apply it to the sticky nail, as shown above on my middle finger. Smooth out any bubbles.
    7. Using cuticle nippers, trim off the excess nail polish around the nail.
    8. If there is any nail polish remaining that needs to be removed, you can clean it further using a brush and acetone/nail polish remover. For detailed information on how to do this, you can take a look at my clean-up tutorial.
    9. Add a topcoat and you are done! 

    I hope I have succeeded in making a clear tutorial on the technique I use. If something does not make sense, please don't hesitate to ask questions.

    I'd love to know what you think of this!

    Thanks for looking!
    Anutka :)

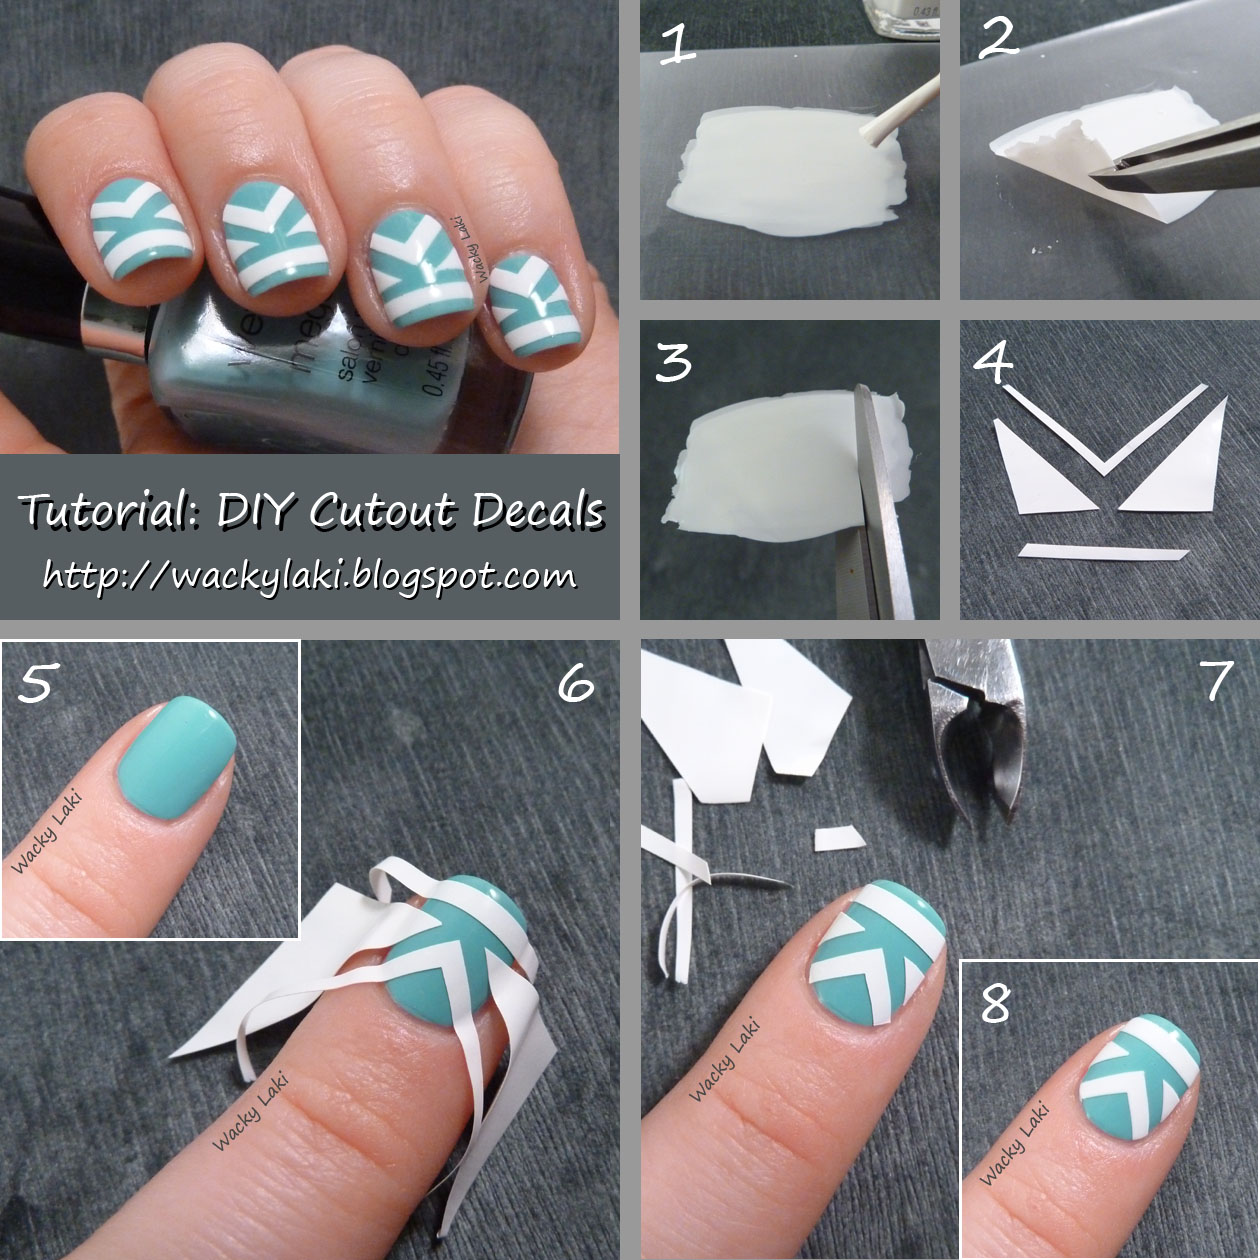
    Tutorial Tuesday: DIY Cutout Decals

    Tuesday, April 17, 2012
    As promised, I have a tutorial for the dress inspired manicure from last Friday. This is made with a technique that I have been playing with for a while and involves nothing more than some nail polish and a ziplock bag. I think the possibilities with this technique are endless. These cutout decals are just one example of what you can do...

    Supplies
    Steps

    Insutrctions
    1. Using white nail polish, paint a rectangle about 1.5x larger than your nail on the ziplock bag.
      - Apply a second coat if needed to reach full opacity.
      - Allow to dry completely (I usually let this dry overnight)
    2. Peel the sheet of nail polish off the ziplock bag. Sometimes it helps to use tweezers to get it started, but it should peel off easily once a corner is lifted.
    3. Using scissors, cut out the decals as shown above
    4. The cutout decals should look approximately as shown in Step 4.
    5. Apply desired number of base color coats.
    6. When the polish is still slightly tacky, but not wet, apply the decals to the nail as shown above.
      - If you are starting out with an existing manicure that is already dry, apply a coat of clear polish and allow it to get tacky for decal application...
      (Please excuse the extra large decals I created... they certainly don't have to be this big :) )
    7. Using cuticle nippers, clip the decals as close to the cuticles as possible
    8. Clean up the edges as needed. If you didn't clip as perfectly as you wanted, take a look at the cleanup tutorial on how to get a clean line near the cuticle. Since the decals are made of nail polish, they should easily dissolve and clean up with acetone/nail polish remover...
    9. Apply a top coat and enjoy :)

    I hope you enjoyed this tutorial! I would love to know what you think of it...

    As always, if you try this or any of my other tutorials/manicures, I would love to see your creations :)

    Thanks for looking!
    Anutka :)

    Tutorial Tuesday: Argyle

    Tuesday, April 10, 2012
    At some point I will catch up with all the tutorial requests from the last few weeks months, but for now I'm starting with the argyle tutorial. You can see the original manicure here. I apologize in advance for my shaky lines, but I think it still does the job of showing how to make it :)

    Let me know what you think of this style of tutorial... all images in one block...


    Supplies: 
    - Base polish (Barielle Cashmere or Loose Me)
    - Acrylic paint in white and green
    - Polish (or acrylic paint) in orange (used here Essie Braziliant)
    - Top coat.
    - Optional: Essie Pure Pearlfection for shimmer.

    Steps:
    1. Apply desired number of base color coats. Shown here 2 coats of Barielle Cashmere or Loose Me.
    2. Using white acrylic paint, draw diagonal line from the base of the nail to one side
    3. Draw a second diagonal line parallel to the first as shown above
    4. Add two more lines perpendicular to the first two, creating a diamond shape
    5. Using white acrylic paint fill in the diamond and triangles at each corner
    6. When the acrylic paint is dry, apply a coat of Essie Braziliant over the white paint
    7. Add a second coat of Essie Braziliant if needed
    8. Using green acrylic paint (or nail polish) create an X across the nail
    9. Add remaining green lines to complete the argyle pattern as shown above
    10. Go over everything with a top coat and enjoy!
    - Optional: You can add a shimmer such as Essie Pure Pearlfection prior to top coat if desired. See my original manicure for photos with and without the shimmer. 

    I hope you enjoyed this tutorial! Let me know what you think of it!
    As always, if you give this a try, send me a link... I would love it see it :)

    Thanks for looking!
    Anutka :)

    Tutorial Tuesday: Freehand Flowers

    Tuesday, February 28, 2012
    When I posted this manicure earlier this month, I received lots sweet comments along with a few requests for a tutorial. Before starting the tutorial, I must preface it by saying that I freehanded each flower using a tiny brush and it took much longer than it should have. Since then I realized there is a much easier way to get the same result, so this is how I would make this manicure if I were to do it again...


    Supplies:
    - Base color nail polish (I used Zoya Kendal)
    - Acrylic paint (or nail polish) in white, lavender and purple. Alternatively you can use just white and purple and mix the two colors to get an intermediate.
    - Accent color (acrylic paint or nail polish) - I used Sinful Colors Flower Girl which is a nail art polish.
    - Brushes - one small accent brush and one larger to paint the white
    - Dotting Tools in various sizes


    Step 1:
    - Apply base coat and desired number of coats of polish and allow to dry completely (this it two coats of Zoya Kendal)
    - Using white acrylic paint (or nail polish) outline a curve covering slightly less than half the nail
    - Fill in the area with white paint or polish.
    NOTE:  I prefer acrylic paint for this step because it dries quickly.


    Step 2:
    - Using a medium size dotting tool and the darker color (purple) make 5 dots in a flower shape.
    - Add a dot in the middle of the flower to fill in the shape.
    - Using different size dotting tools add desired number of flowers.


    Step 3:
    - With a slightly smaller dotting tool, place a lavender or white dot on top of each existing purple dot in the flowers.
    - There should be some purple showing along the edge of the new dot.
    - Fill in the center of the flower using the lavender or white color.
    - Repeat this for all the flowers.


    Step 4:
    - Using a small detail brush and the darker color, add a few lines from the "petals" to the center of the flower
    - Add small curls and leaves using the detail brush


    Step 5:
    - Place a dot of accent color in the center of each flower
    - Add a top coat to seal everything in and you are done!


    I hope you enjoyed this tutorial and I would love to know what you think of it!
    Let me know if you try it!

    Thanks for looking!
    Anutka :)

    Tutorial Tuesday: Clean Up...

    Tuesday, February 21, 2012
    I have been debating whether I should make a clean up tutorial or not for a while now since there are other tutorials out there that describe this method. In fact, it was not too long ago that I was learning from such tutorials. Recently I received a sweet email request from a reader asking to see how I clean up my manicures and I could not resist. Hopefully this will be useful and show a few tricks I have picked up along the way.


    Supplies:
    • 100% Pure acetone - Even though for removing nail polish I use my acetone with glycerin mix, for clean up I prefer to use pure acetone. This is what works best for me, but this technique will work with other nail polish removers, if you are not an acetone fan.
    • Eyeliner brush - I have tried different brushes for clean up and find that the shape and flexibility of this type of brush works best for me. However, I suggest experimenting with different brushes to find one that works best for you.
    • Contact lens case - Any small, airtight container should work. I happen to have lots of contact lens cases around, so I dedicated one to manicures. This allows me to reuse the acetone for multiple manicures. I just keep adding pure acetone when it runs low and I like that I don't have to waste it after each clean up because it has a cap. The right side of my contact case has acetone and the left side has water. I use the water to rinse the acetone off the brush after using it. This helps extend the life of the brush.
    • Cuticle Pen - This is my favorite way to moisturize the cuticles after pure acetone. I use the Elf Nourishing Cuticle Pen that I get for $1 at Target. It has a stiff tip that allows me to apply the oil while the polish might not be completely dry yet without ruining the manicure.

    A closer look at the brushes. All of these are inexpensive eyeliner brushes and all work equally well. I like the eyeliner brushes because they are flat and easily fit the contour of the nail.
    • Top - This is a Wal-Mart store brand brush. It is inexpensive, but the bristles fall out extremely quickly (quicker than any other brush I've used). I bought a few at once so I have a new one to show here, but I rarely use this brush now.
    • Middle - An Essence brush. This brush works very well and so far has held up perfectly to acetone.
    • Bottom - This is a Target store brand brush. It is my most used and abused brush. I love it and used it for this tutorial...

    Start:
    - Apply a base coat and desired number of coats of nail polish
    - Note: I go through the clean up steps prior to adding a top coat, but you can choose to apply a top coat before the clean up. I find that cleaning up before the top coat works better for me for two reasons. One, while I'm doing the clean up, the nail polish has time to dry and the topcoat doesn't bubble as much as it does over fresh polish. Two, the top coat is more stubborn to remove so it makes the clean up process longer.

    Step 1:
    - Pour some acetone into a small container (it is slightly pink in the photos from a previous manicure).
    - Dip the brush into acetone
    - Run the brush along the side of the container to get rid of excess acetone. This helps ensure that the cuticles don't get flooded with acetone and ruin the manicure.


    Step 2:
    - Place the brush at the base of the nail
    - Sweep the brush along the cuticle toward the tip to remove the excess polish
    - Rinse the brush in acetone
    - Repeat the sweeping motion with the brush if needed until all of the excess polish is removed


    Step 3:
    - Starting at the base again, run the brush along the other side of the nail (I turn my nails to face me so that the the brush is never blocking my view of the nail)
    - Rinse the brush and repeat as necessary until the cuticles are clean


    Step 4:
    - Apply a top coat (if not already applied)
    - Using a cuticle oil pen, run along the nail in a similar sweeping motion as with the brush in Steps 2-3


    Done!
    - Allow the nails to dry and enjoy!


    I hope found this tutorial useful. Please let me know what you think of it!

    Thanks for looking!
    Anutka :)

    Tutorial Tuesday: Silver Tips

    Tuesday, January 10, 2012
    I had a few questions about how I did the tips for my Chanukah manicure back in December, so I promised a tutorial. Just to set the record straight, I did not freehand the lines, although I wish I was good enough to do that :D. I hope this tutorial helps those of you who wanted to try it.


    Supplies:
    - Base and accent polishes of choice. I used Ulta Wild Night for the base and Sally Hansen Celeb City for the tips
    - Striping tape in any color (I bought mine on ebay, just search "striping tape" if interested)
    - Scotch tape or painter's tape
    - Scissors
    Step 1:
    - Apply desired number of coats of your base color
    - Allow polish to dry completely!
    Step 2:
    - Once the polish is dry, apply a piece of striping tape a desired distance from the tip.
    Step 3:
    - Place a piece of scotch or painter's tape a desired distance from the striping tape.

    Step 4:
    - Paint the tip of the nail with the accent polish, making sure to cover all tape free areas of the nail
    Step 5:
    - Carefully remove the scotch tape

    NOTE: Do not wait for the polish to dry, remove the tape right away.
    Step 6:
    - Remove the striping tape to reveal the double lines
    - Add a top coat and you are done!

    NOTE: when doing a full manicure, paint and un-tape one nail at a time. Doing multiple nails at a time will increase the chance that the polish starts to set and the tape will not come off cleanly.


    I hope you enjoyed this quick tutorial. I would love to hear your thoughts or questions about it or if you try it! Also, let me know what you like/don't like about the tutorial so I can improve for next time :D

    Thanks for looking!
    Anutka :)

    Tutorial: Flower Field

    Thursday, November 3, 2011
    I had promised to do a tutorial for this flower manicure from challenge Day14 a few weeks ago, but got wrapped up in all the Halloween fun and didn't get around to it, so here it is. Hopefully better late than never :)


    Supplies:
    - For the colors I used: Sally Hansen - Mint Sorbet, Wet n Wild - French White Creme, Ulta Professional - Green With Envy, Sinful Colors - Envy, Barielle - Tight Knit, Two-Way Nail Art Pen in Yellow

    - Detail brush, mine is size #000
    - Piece of faux seafoam sponge (or cosmetic wedge)
    Step 1:
    - Apply desired number of coats of base color.

    - I used 2 coats of Sally Hansen Mint Sorbet
    Step 2:
    - With the white draw petals to create a basic daisy shape

    - I used Wet n Wild French White Creme for the petals
    Step 3:
    - Draw desired number of daises
    Step 4:
    - With a dark green, draw stems from each daisy to the tip of the nail
    - Add a few extra stems without flowers as desired

    - I used Ulta Professional Green With Envy for the stems
    Step 5:
    - Add a yellow dot at the center of the flower
    - You can do this using a toothpick, dotting tool, or Nail Art Pen as I did
    Step 6:
    - With a brown polish add a small outline above the yellow at the top of the flower center

    - For this I used Barielle Tight Knit
    Step 7:
    - Place a dot of green polish on a disposable work surface such a piece of paper or plastic
    - Tap the sponge into the polish to work it into the sponge
    - Gently tap the sponge on the tip of the nail.
    - Don't forget that you can always add more color, but you can't take it off, so be gentle :)

    - For sponging I used Sinful Colors Envy
    Done!
    - Add a top coat and you are done!

    As always, I'd love to hear your thought, comments and suggestions!

    Thanks for looking!
    Anutka :)

    Tutorial - Gradient

    Tuesday, October 18, 2011
    Here it is, the long overdue tutorial for the gradient nails from challenge day 10. A reminder what what the manicure looked like...


    Supplies:
    - Nail polishes - Black, dark gray, gray, white, and glittery silver
    (I used Wet n Wild Black Cream, Zoya Kelly, Petites Color Fever Vintage Gray, Wet n Wild French White Cream, Sinful Colors Out of This World)
    - Sponge - different types will work for this, but I used an artificial sea foam sponge
    - Q-tip for clean up
    - Tweezers for holding the sponge (if you use a small piece)
    Step 1:
    - Cut off a few pieces of the sponge
    Step 2:
    - Apply a base coat and
    - Apply desired number of base color coats
    - Shown here is 1 coat of WnW Black Cream
    Step 3:
    - Put a few drops of the dark gray on a piece of paper (or other work surface) and work the color into the sponge by dabbing it.
    Step 4:
    - Lightly tap the sponge on the nail from tip towards the base, leaving about 1/4 of the base unsponged.
    - Add in small amounts until satisfied with the look
    Step 5:
    - Work the lighter gray color into another side of the sponge (or a clean sponge piece)
    Step 6:
    - Lightly tap on the nail starting from tip and going about half way down.
    - Add a little bit at a time to get the desired effect
    Step 7:
    - Work the white polish into the sponge as before
    Step 8:
    - Tap the white on the tip of the nail
    Step 9:
    - This step is optional, but to give the gradient some glitter and sparkle, work a silvery color into the sponge.
    Step 10:
    - VERY LIGHTLY tap on the nail.
    - I put a little bit too much and ended up muting the black and the dark gray out (compare to to original manicure to see what it should have looked like :))
    Step 11:
    - With a Q-tip or a brush dipped in nail polish remover/acetone, clean up the cuticles
    All Done!
    - Add a top coat and you are done!

    I hope you enjoyed this tutorial! As always I would love comments and feedback so that I can improve :)

    Thanks for looking!
    Anutka :)