Showing posts with label Born Pretty Store. Show all posts

Born Pretty Store Water Decals...

Saturday, September 21, 2013
Today I would like to show you a manicure with floral water decals that I got for review from the Born Pretty Store. I have been smitten water decals for a while now and my obsession continues. It is such a simple way to dress up a manicure. This rose pattern mimics a one-stroke technique, but requires none of the skills or practice needed to achieve it freehand...


For this manicure, I water decals G027, which are pictured here on the right. I also got some pretty violet roses which I will show you another time and those are item H027. Each package contains one sheet of water decals with various rose patterns...


The directions are included on the back of each package. I followed these instructions for my application, although I did not blow dry them in the end...


The base for this manicure is Zoya Pepper from the Fall Cashmeres collection. I love the way the roses pop against the darker background. I would love to one day be able to paint roses such as these freehand, but for now, I will be happily content with using decals...


I'd love to know what you think of this manicure!

Thanks for looking!
Anutka :)


** Polish and decals were provided to me for review by the manufacturer or their PR. **
** For more information please see the disclosure policy **

31DC2013 Day 12 - Stripes

Thursday, September 12, 2013
Today is Day 12 of the 31 Day Nail Challenge and the theme today is stripes. I initially had this manicure in mind for the metallic challenge back on day 8, but when it was all said an done, I thought it would look perfect for a stripes pattern. I guess that's one benefit of trying to make manicures ahead of time, I could play musical chairs with them...


This manicure started out with a base of OPI Haven’t the Foggiest, a gorgeous metallic gunmetal gray. Again, I promise to have swatches of this collection to show you soon! Using silver and black studs from the Born Pretty Store, I created the rows of studs...


The studs from The Born Pretty Store are sold in small bags, but I like to transfer them to these easy to store containers. There is a lots of studs in each package....


What do you think of this manicure? Something a little edgier? :)

P.S. This post is pre-scheduled while I'm on vacation. I may not be able to respond to comments until I return, but I greatly appreciate them and will respond as soon as I return!

Thanks for looking!
Anutka :)


** Polishes were provided to me for review by the manufacturer or their PR. **
** For more information please see the disclosure policy **

31DC2013 Day 8 - Metallic

Sunday, September 8, 2013
Today is Day 8 of the 31 Day Nail Art Challenge with the theme of Metallic nails. What could be more metallic than nail foils? I have not gotten to play with nail foils to much, but I recently got the Best Glue Ever (yup, that's what it is called) and I'm so in love. I'm sure you'll be seeing more foiled manis in the future, but here is one for today...


For this manicure I started out with OPI Incognito in Sausalito, a dark nearly black blue cream. I will have full swatches for you when I return from vacay! For the foil, I watered down a few drops of the Best Glue Ever and then applied it with a fan brush in a random pattern. When the glue dried, I applied the foil over it. The foil I used is  from The Born Pretty Store...


I just love how this turned out! Really couldn't stop staring at it. And by the way Best Glue Ever, is really the best glue ever! So much easier to apply nail foils than with nail polish. No more mess or frustration! Hence why you'll be seeing more foil manis in the future ;)


What do you think of this look? Have you tried nail foils yet?

P.S. This post is pre-scheduled while I'm on vacation. I may not be able to respond to comments until I return, but I greatly appreciate them and will respond as soon as I return!

Thanks for looking!
Anutka :)


** Polishes were provided to me for review by the manufacturer or their PR. **
** For more information please see the disclosure policy **

Running Wild...

Friday, August 23, 2013
I'm not sure what has gotten into me, but something certainly has since this is my second tiger manicure this month. I got some fun neon nail studs for review from the Born Pretty Store and they really brought out my wild side. I wanted to pair them with an equally bright and matching color.


For my index, middle and ring fingers I started with a base of Nicole by OPI Sweet on Pete. I stamped the zebra pattern from Bundle Monster BM-223 using Essence Stamp Me! Black. I then sectioned off my nail using scotch tape and painted half of it black using Wet 'n Wild Black Creme. The pinkie finger is also Black Creme. While the polish was still wet, I added the nail studs and covered everything with a top coat...


I just get a fun 80s vibe from this manicure and it puts me in a good mood...


And as you might have expected, they do glow under black light. This photo doesn't do justice to just how bright they really glow!


These fun square neon nail studs (Item #6968) come in a variety of colors. The studs that I got are 2mm in diameter, but they are also available in a slightly larger 3mm size. Each bag of studs contains plenty for lots manicures...


What you think? Would I fit in back in the 80s with this mani?

Thanks for looking!
Anutka :)


** Polishes were provided to me for review by the manufacturer or their PR. **
** For more information please see the disclosure policy **

Born Pretty Store Gel-off Clips Review

Tuesday, August 13, 2013
Hi Everyone! Today I have a review of Born Pretty Store Gel-off clips to share with you. I was so excited to try these clips because I love glitter, but hate messing with the foil removal method. Since I often add glitter later on to my manicure, I don't always think ahead to use of the peel-off base coat and end up having to remove glitter the hard way. These Gel-off clips seemed like the perfect solution for removing glitter and teased me with the promise of "no need for foils" right on the package.

The package comes with five clips. Except for the thumb clip which was too large for me, the rest of the clips fit well. They are held together by a small black rubber band which is a bit flimsy, but usable. I wish that they would have provide a bit more pressure since these felt loose...


Using these couldn't be easier. Just soak a cotton or felt square in nail polish remover. Cover the nail with the soaked material and place the clip over it. Then let it all sit that way for a few minutes before removing the clip and wiping off the polish.

Although I was worried about them not providing enough pressure, that didn't seem to affect the outcome. After a few minutes, the glitter easily wiped off the nail. No more rubbing...


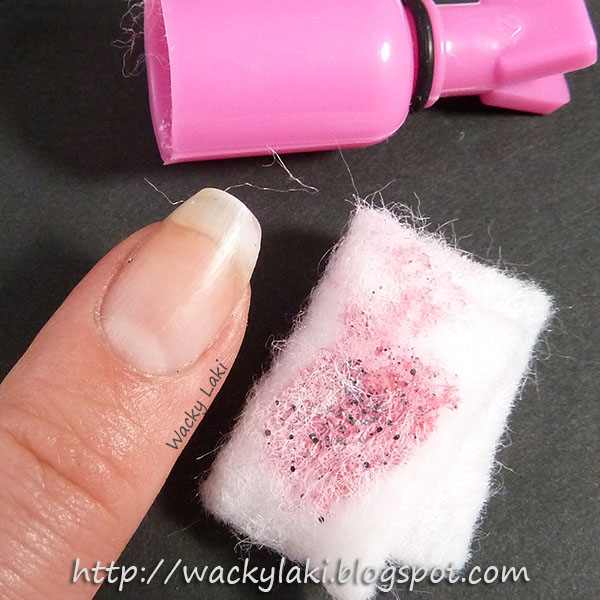
Now here is the ugly side of these clips. They are NOT acetone resistant and that just baffles me. After a few seconds of contact, the acetone started to melt the plastic of these clips. I could smell a very chemical odor which is what I assume was the smell of melted plastic. After I opened the clip and removed my nail, I had to rip the felt out of the clip leaving behind lots of fibers, a bumpy surface inside the clip and an awful smell....


You can see on this piece of felt a pink area of the right side. That pink spot is actually melted plastic... so sad...


Normally I love Born Pretty Store products for my nail art, but I was really disappointed with the quality of these clips. Although they worked as promised for removing the glitter, this is the first BPS product that I would not recommend for purchasing. I just don't understand how clips which are meant to hold acetone soaked material in place are not acetone resistant. I also wonder if the outcome would be different with non-acetone remover, but I don't have any to test it out...

Thanks for looking!
Anutka :)


** Product was provided to me for review by the manufacturer or their PR. **
** For more information please see the disclosure policy **

Born Pretty Store Nail Foils

Tuesday, July 16, 2013
Today I would like to show you my very first attempt at using nail foils. A while ago, I received three different foils for review from the Born Pretty Store. I delayed trying them out because I assumed these needed special foil glue and frankly I was a bit intimidated. I finally realized that nail glue is optional and got over my fear to try them all. Sadly, I lost the photos for two of the manicures when my computer crashed so I will have to play with those again. At least my first one survived and I can share it with you today...


I chose to use a metallic base of Zoya Bobbi underneath the foil, figuring that if I did not get complete coverage with the foil, it would not be too obvious where the foil ended and the metallic polish began. After Bobbi was completely dry, I added a clear coat and waited until it was almost dry, but still tacky to the touch. I then simply pressed random sections of the foil onto the nail. Turns out it is actually rather simple and not something to fear. The result I think is pretty fun...


A bit of a closeup... a graffiti look?


Here are the foils I got for review. The one in the front (foil #27) was used for this manicure. I will show you the other two (foil #6 and #17) when I get a chance to redo the manicures...


If you are interested in purchasing foils or any other products from the Born Pretty Store, feel free to use the coupon code of AG5J61 for 10% off your purchase...


Have you tried foils already? What do you think of them?

Thanks for looking!
Anutka :)


** Products used in this post were provided to me for review by the manufacturer or their PR. **
** For more information please see the disclosure policy **

Born Pretty Store Nail Stickers...

Tuesday, June 11, 2013
I got some cute nail stickers from the Born Pretty Store to show you today. These embossed metal stickers are unlike other stickers that I have tried in the past so I was excited to incorporate them into my nail art. The stickers come in a variety of styles from common shapes to beautiful scrolls. I got a sheet with lots of small shapes and decided to play around with little flowers for today's manicure...


This manicure started out with Shimmer Lorene layered over OPI Chic From Ears to Tail. After placing the stickers in on the nail, I used Pure Ice Silver Mercedes to create the ruffian edging and add a few dots. Not wanting to complicate things, I added a top coat and called it a day. Pretty much as easy as it gets...


I really like these little stickers, however, they refuse to contour to the nail. No matter what I tried they straightened out leaving little petals sticking out. They are quite sturdy and stubborn. Although they are very cute, I was disappointed at how they behaved on the nail...


The stickers (item #5659, style #3) come on one large sheet with lots of designs to choose from. Some are more abstract than others. I'm quite partial to the flowers, hearts, snowflakes and shamrocks (which will come in handy next year). They are misleadingly called Nail Tattoos right on the package, but in fact they are stickers...


If you are interested in purchasing these or any other items from the Born Pretty Store, don't hesitate to use the coupon code of AG5J61 for 10% off your purchase...


Thanks for looking!
Anutka :)


** Polishes were provided to me for review by the manufacturer or their PR. **
** For more information please see the disclosure policy **

Born Pretty Store Miki Nails Water Transfer Decals Review...

Tuesday, May 28, 2013
I have been on a roll trying out different types of nail wraps these past few weeks and today I have another set to show you. These are Miki Nails from the Born Pretty Store. I was a bit scared to try these decals at first and kept procrastinating reviewing them. I think it was partly because I don't use water decals often enough to feel comfortable, so I wanted to make sure I had plenty of time in case I messed up. And let's just pretend it had nothing to do with the fact that I didn't choose this pattern and I wasn't too fond of it when I first saw it. Seeing it on my nails certainly changed my mind and I'm really excited to show these to you today...


This is Miki Nails pattern 09, which I have affectionately nicknamed "gluttony" for the delicious donuts, cakes, candies and other sweets that make up this pattern. I kept thinking how perfect they would have been for the Polish Days challenge of 7 Deadly Sins. It doesn't get any more gluttonous than this...


The decal kit includes a sheet with 12 tips, nail file and directions on the back of the package. This is enough for one manicure, unless you have short nails and can get away with cutting one decal in half to use for two nails. Mine are just a bit too long for that to work. I'm not sure why the nail file is included since I had no need for it, but it is teeny and adorable, perfect size to throw in your purse.


Application is very easy:
  1. Start out with clean nails
  2. Cut the decals apart and trim the length to fit the nail
  3. Soak in water for 10-20 seconds until the decal slides off the paper backing.
  4. Position on the nail and dab excess water off with a paper towel.
  5. If needed, trim any excess along the tip/sides of the nail
  6. Apply a top coat to seal
The top coat is a vital step in this process because these decals don't stick on their own. I actually thought I was doing something wrong at first. However, these strips are made of nail polish and the top coat acts to melt the decals onto the nail. It is quite amazing actually and I instantly fell in love with these decals. I might go as far as to say these are my new favorite wraps/decals.


What I love about these decals is that they are made with real nail polish so clean up is a easy peasy with polish remover or acetone. They are very, very thin, but not fragile. Easy to re-position, as long as they are wet. They feel like nothing is on the nail except for a coat of polish. As the top coat melts them, they fuse to the nail leaving no tempting gaps or folds to pick at. As you can see, I'm kind of enamored with them...

My nails are very flat with the exception of the index finger which curves ever so slightly, so I can't comment too much on how these work with curved nails. On my index finger all ridges easily evened out with the top coat leaving behind a nice smooth surface...


These decals are available in 24 different patterns and I'm already picking out the next designs to order... #5, 15, 17, 20 and 22 are calling my name...

If you want to order these nail decals or any other products from the Born Pretty Store, feel free to use the coupon code AG5J61 for a 10% discount...


Thanks for looking and commenting!
Anutka :)


** Products provided for review by the manufacturer or their PR. **
** For more information please see the disclosure policy **

Violet Beauregard Inspired...

Tuesday, April 30, 2013
Today I have a very special reader requested manicure to share with you. A few days ago I got a request for a manicure inspired by the outfit of Violet Beauregard from the original Willy Wonka movie. I pried a little as to the significance of this particular movie character for her, partly because I was curious and partly to draw inspiration. The answer was simple, she has autism, she loves Violet, and these happen to be her school colors. Enough said!


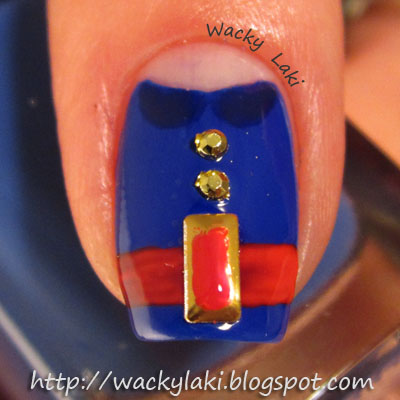
To create this manicure I started out with a bit of Liquid Palisade (LP) covering the half moon of each nail. I must really be determined to see how manicures I can get out of the little tube since I seem to be using it a lot lately. I then painted the nails with Barielle Blue Capri (full swatches coming soon) and removed LP. Using a detail brush and OPI OPI...Eurso Euro, I added the dark blue collar. Using red acrylic paint, I added the red stripe for a belt and accented the belt with a gold rectangular stud from the BornPrettyStore. I painted the center of the stud using Barielle Big Apple Red. The 'buttons' are little gold studs that I got from Cult Nails a while ago...


Next to the inspiration character herself... :)


Thank you to my lovely reader for this request! I hope you like it.

Thanks for looking!
Anutka :)


** Polishes were provided to me for review by the manufacturer or their PR. **
** For more information please see the disclosure policy **