Fashion Friday: Fall Into Red...

Friday, August 31, 2012
I've got a fashion inspired manicure for you today. This is inspired by a Jenny Packham dress right of the Fall/Winter 2012 runway. Please don't be fooled, I have no idea what I'm talking about. I am really not someone who keeps up with current fashion or what's hot on the runways. This dress just caught my eye on Pinterest and I turned to trusty Google to clue me in on the designer. I figured it was perfect to go along with a shade from Zoya's runway Diva collection...


For the base of the manicure I started out with Zoya Anne, which I really should have reswatched while I was at it, but I got too caught up. It is a nice nude shade with a hint of shimmer. I stamped using Wet 'n Wild Black Cream and Bundle Monster plate BM-201 for the little curls. Leaving a few areas exposed, I painted the rest with Zoya Elisa*, a gorgeous crimson red.


I hope you like it! Let me know what you think of it :)

Thanks for looking!
Anutka :)


** Polishes marked with an asterisk (*) were provided to me for review by the manufacturer or their PR. **
** For more information please see the disclosure policy **

Tutorial: Peel Off Base Coat

Thursday, August 30, 2012
I recently learned of this technique and while it is not my original idea I wanted to share a quick tutorial with you because it is just pure genius. Anyone who wears glitter nail polish will know what a pain in the behind it is to remove. Sure there are tricks to make it easier such as the foil method, but how great would it be to not have to soak your fingers in acetone? Essence recently came out with a peel off base coat which does just that. It didn't take long for those who tried it to notice that it bears a strange resemblance to craft glue... which leads me to this extremely cheap, simple and effective peel of base coat...

Supplies:
  • Elmer's School Glue (washable, safe, non-toxic)
  • Empty nail polish bottle
  • Polish of choice
  • Cuticle pusher (optional)

Steps:

Instructions:
  1. Transfer some craft glue to an empty nail polish bottle and apply to clean bare nails as a base coat
  2. Allow the glue to completely dry. It will turn clear (slightly matte) and be non-sticky to the touch
  3. Apply any polish and topcoat as you normally would. Shown here is three coats of Shimmer Melissa with a topcoat.

  4. Enjoy your manicure! 

  5. When you are ready to remove the polish, take a plastic cuticle pusher (or just use your other nails) and starting at the base of the nail and gently lift the edge
  6. Continue to peel the polish off
  7. Tada! Removing glitter polish has never been this easy. Wash hands to remove and remaining glue residue and you are done!

I will definitely be wearing glitter more often now! A little bit of waiting for the "base coat" to dry is nothing compared with the pain of glitter polish removal!

How long does it last?
That will depend on whether someone picks at their nails or not. Using the craft glue as a base coat will certainly not last as long as other base coats especially for those who pick at their nails. For those who are not pickers it can easily last for a few days. I've tried it a few times and it has lasted perfectly for a full day of wear until I chose to remove it. It easily survived through showers and dish washing which was my primary concern with a water based glue...

Is it safe?
Craft glue is safe and non-toxic. Children for generations have used this in schools, some I'm sure have even eaten it (although I would not recommend that). I will venture to say it is much safer than soaking your nails in acetone to remove glitter...

Really brings back childhood memories of putting glue on my hand and letting it dry just to peel it off later...

Have you tried this technique? Let me know what you think of this or if you have any questions! :)

UPDATE: Gina of Soguesswhat11 did a fantastic test wear video of this technique. Take a look to see how it holds up to days of wear compared to a regular base coat and even basecoat under glue!

Thanks for looking!
Anutka :)

Mermaid Scales...

Wednesday, August 29, 2012
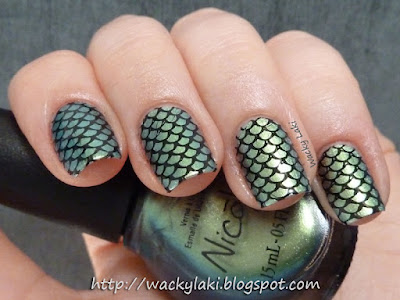
I often draw inspiration from the name of the polish so it is only natural that Nicole by OPI Mer-Maid For Each Other inspired a mermaid tail manicure. With a bit of stamping and a dash of glitter this is exactly what I envision a mermaid tail to look like. Now if only I could find one to confirm.... ;)


I stamped using Wet 'n Wild Black Cream and DashicaBeautyShop plate SdP-O over NOPI Mer-Maid For Each Other. It looked pretty cute all by itself, but even a mermaid needs some glitter in her life. Shimmer Linna was the perfect touch to add to the tips...


Here is what it looked like pre-glitter tips....


That beautiful blue green duo-chrome shift...


So what do you think a mermaid tail looks like?

Thanks for looking!
Anutka :)


** Polishes were provided to me for review by the manufacturer or their PR. **
** For more information please see the disclosure policy **

Plucked Chicken!

Tuesday, August 28, 2012
So the title might be a somewhat misleading... I did not actually pluck or otherwise harm any chickens! Just thought it would make for a funny title. My brother and his family got five baby chicks this past spring. They have been growing and shedding some pretty feathers. I happened to be at their house a few weeks ago and picked up a few feathers outside the pen that I thought where pretty. This is a manicure I've wanted to make for quite a while, although honestly I always assumed it would be with store bought feathers. This just made it more fun...


Here are the two feathers I picked up. The pattern on these is so pretty...


For the manicure, I used a base of OPI Don't Talk Bach to Me and added the feathers. I'm not entirely sure I like this color combo, but I wanted the feathers to stand out a bit. Maybe next time I will try it over a beige base...


Here are the chicks shortly after they first got them. So little and already starting to get their pretty colors...


Here is what they looked like a few weeks ago when I got the feathers. One of those chicks turned out to be a rooster. I'm kind of hoping he looses some pretty tail feathers at some point. The little gray/orange hen at the front could also contribute...


Oh and did I mention that my mom has two hens as well that are black and white speckled... I'm seeing some feather manis in my future. This one was fun :)

P.S. As I was was sorting the photos for this post, I was also trying to read my blog subscriptions and I came across a manicure by Neues vom Kellerkind. She created a manicure using feathers from her mother's hens! Her mom's hens look just like my mom's hens... black and white speckled. What an awesome coincidence. Be sure to check out her manicure. I think she did an amazing job and it is exactly what I'd like to try next time... over beige :)

I'd love to know what you think of this! Let me know by commenting below :)

Thanks for looking!
Anutka :)


** Polishes were provided to me for review by the manufacturer or their PR. **
** For more information please see the disclosure policy **

Shimmer Polish: Melissa, Jennifer, Stephanie, Tracy and Jenny...

Friday, August 24, 2012
Just as promised, I have more Shimmer polish pretties for you today. These are all created by the sweet and super talented Cindy. In case you missed yesterday's post, make sure to check it out here to see more Shimmer polishes. These are gorgeous, incredibly sparkly and all very unique. I'm already dreaming of the glitter jelly sandwiches and the gradient tips manicures I'll be trying with these, but for now take a look at the swatches...


All these polishes have a great formula that does not clump or drag. The glitter spreads easily and evenly. I used one generous coat of glitter over a coordinating base color and followed that up with a nice top coat. Most of these can also be worn on their own at about three coats. Can't go wrong either way...

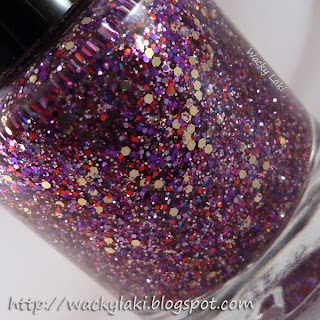
Shimmer Melissa (over OPI Germani-cure by OPI)
A violet glitter with gold hex glitters mixed in. There is also some red sprinkled in and a few flashes of blue and green...


Swatch Details
Brand: Simmer
Color Name/Number: Melissa
Number of coats: 1 (over OPI Germani-cure by OPI)
Top Coat: Yes

Free of Formaldehyde, Toluene, Dibutyl Phthalate (DBP)

Shimmer Jennifer (over OPI Nein! Nein! Nein! OK Fine!)
A silver glitter with hex orange and yellow. It also has some holo and color shifting glitter. One moment it flashes blue and is green the next. An incredible mix that works perfectly together...


Swatch Details
Brand: Simmer
Color Name/Number: Jennifer
Number of coats: 1 (over OPI Nein! Nein! Nein! OK Fine!)
Top Coat: Yes

Free of Formaldehyde, Toluene, Dibutyl Phthalate (DBP)

Shimmer Stephanie (over OPI Don't Pretzel My Buttons)
Small blue glitter with larger dark and light blue glitter. It also has some orange, red, purple and holo sprinkled in. Love how this looks over the beige, might be my fave out of these...


Swatch Details
Brand: Simmer
Color Name/Number: Stephanie
Number of coats: 1 (over OPI Don't Pretzel My Buttons)
Top Coat: Yes

Free of Formaldehyde, Toluene, Dibutyl Phthalate (DBP)

Shimmer Tracy (over OPI Suzi & The 7 Dusseldorfs)
An amazing gold mix of small, hex, and even bar glitter. It also has lots of holo glitter that didn't capture well in the photos, but is definitely present in real life...


Swatch Details
Brand: Simmer
Color Name/Number: Tracy
Number of coats: 1 (over OPI Suzi & The 7 Dusseldorfs)
Top Coat: Yes

Free of Formaldehyde, Toluene, Dibutyl Phthalate (DBP)

Shimmer Jenny (over OPI Unfor-Greta-bly Blue)
Blue mix with silver, orange, red and violet throughout. I have a real weak spot for blue and this is another beauty to add to the list that makes me swoon...


Swatch Details
Brand: Simmer
Color Name/Number: Jenny
Number of coats: 1 (over OPI Unfor-Greta-bly Blue)
Top Coat: Yes

Free of Formaldehyde, Toluene, Dibutyl Phthalate (DBP)

The incredible thing about the Shimmer polishes is that they seem to have nearly every color in each bottle yet somehow they are all so unique and from afar have a distinct main color.

Which ones stood out to you?

Here is the info again if you want to purchase any or see more beautiful Shimmer polishes...

Purchase by emailing Cindy directly at shimmer484@gmail.com or through ShimmerPolish on Etsy. Cindy can even custom make a unique glitter polish for you! For more info and giveaways, take a look at her blog and Facebook page...


Thanks for looking!
Anutka :)


** Polishes were provided to me for review by the manufacturer or their PR. **
** For more information please see the disclosure policy **